So it's been a little over a year since the last macOS on ESXi install guide I've written for Big Sur and VMware ESXi 7 Update 1. Subsequently, Apple has released macOS 12 Monterey and VMware has updated ESXi to 7 Update 3.
More...
Although mostly unchanged from the previous guide, I thought I'd write an updated and more simplistic guide to running macOS on vSphere 7. 😀
Below you'll find the step-by-step instructions on how I got this installed in my home lab.
DISCLAIMER
This should only be run in a lab environment and not in a production environment. Don't be that person! 🙄
- Please note: This guide is written for an Intel compute based machine running a Type 1 bare metal hypervisor and not a Type 2 like VMware Workstation or VMware Fusion. -
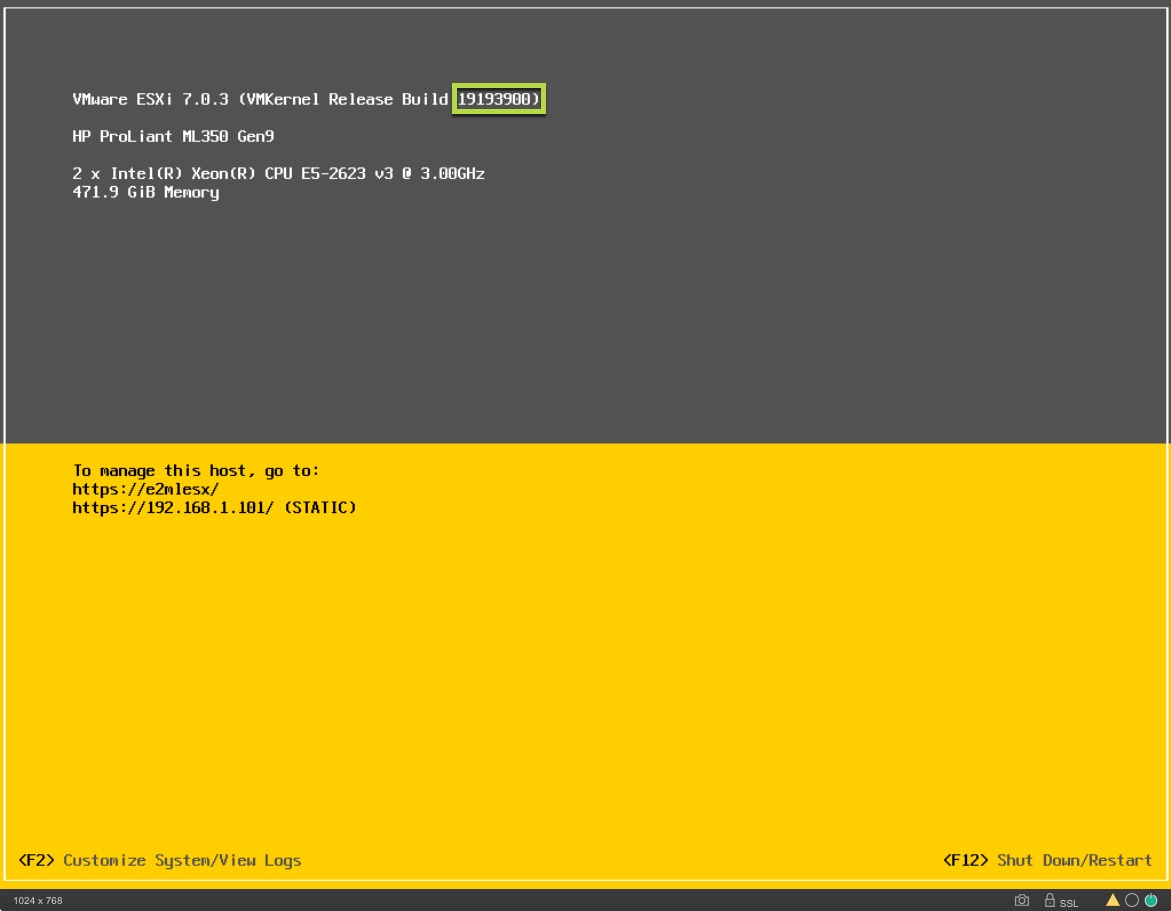
** This guide was written using vSphere 7 U3c build 19193900 & macOS Monterey 12.2 **
Prerequisites
First we'll need the above 3 items in order to complete this whole process. Relax! I'll hold your hand through all the steps in obtaining these prerequisites.

VMware ESXi 7 Update 3
1. Download VMware ESXi 7 Update 3
So first things first! We gotta grab the latest ESXi version and install it prior to installing macOS 12. Go to the downloads page here and select the version of ESXi you have and want to install/update.
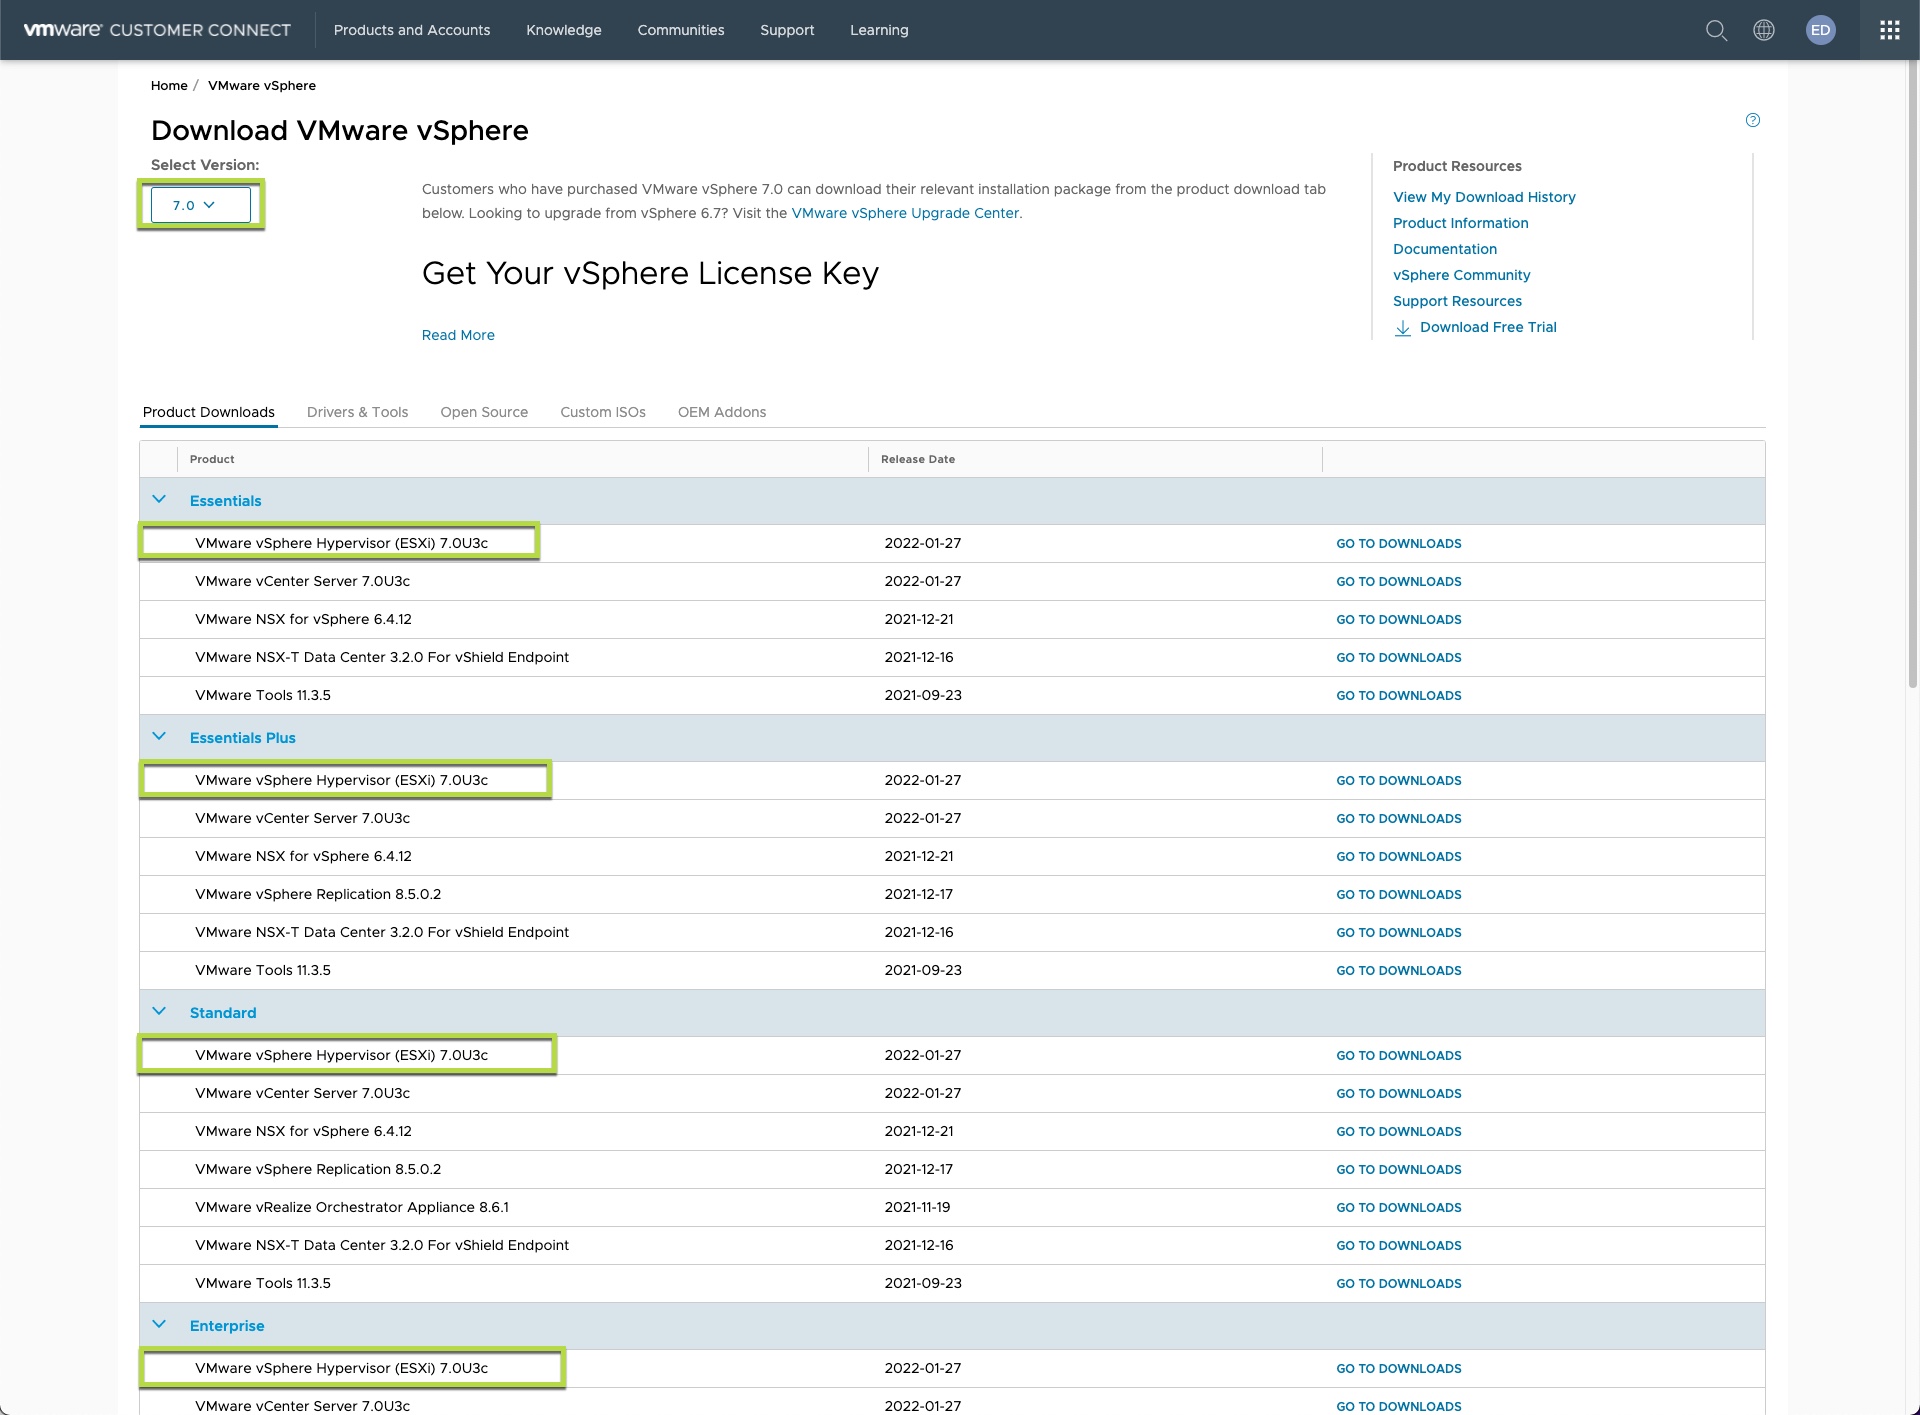
2. Install/Upgrade VMware ESXi 7 Update 3
Once you've selected the correct install for your licensed version of vSphere, you'll simply need to install it. I've written a previous guide on how to Upgrade from an offline bundle here. This is the path I went with in order to update the current ESXi install in my lab.
macOS 12 Monterey ISO
Next we'll need to obtain the macOS 12 Monterey ISO. I'm sure it'll be easy to search the net and find the ISO, but ensure you get it from a valid trusted source. Otherwise make sure you validate the SHA-1, CRC and MD5 values of the image to make sure it hasn't been tampered with before installing it. 🙂
I'll take the safer route and create it myself using a macOS native machine. If you have access to a MacBook, iMac or Mac mini already on Monterey, you should be able to create an ISO from any one of those machines.
Can't you hook a brotha up and let me direct download the ISO from your site?
1. Download macOS 12 Monterey Installer
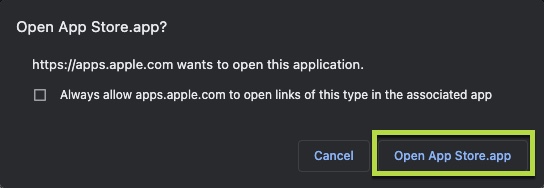
- Once you have a macOS native machine running Monterey in front of you, navigate to the App Store here to download the obtain the Monterey installer. Once you click the link, you should see a browser pop-up asking you to open App Store.app.
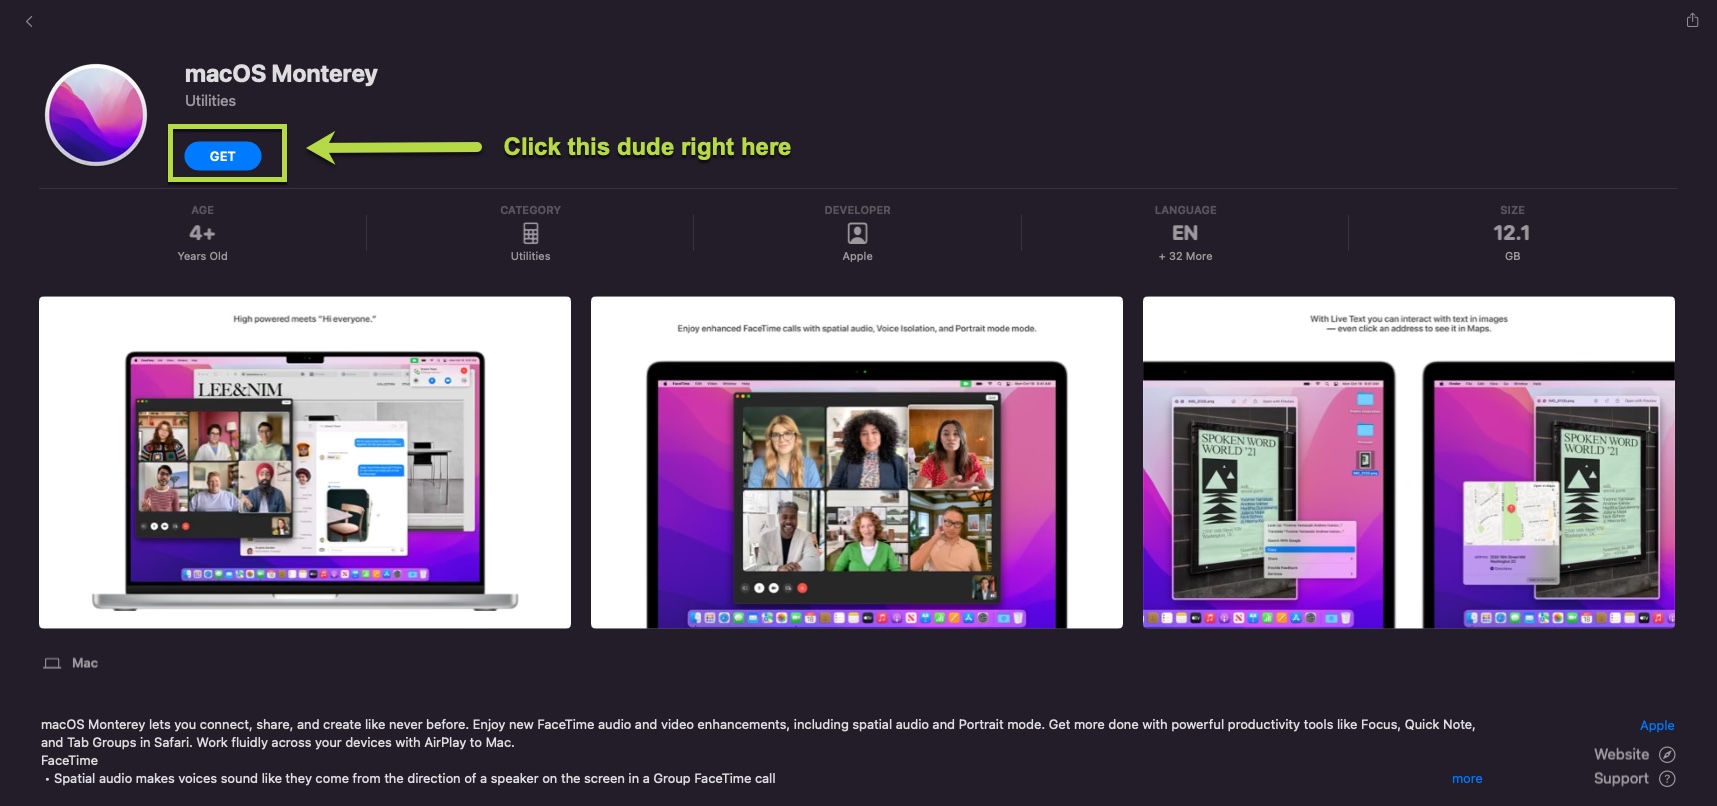
- From there, the App Store app should open up to the Monterey page. click on the Get button to download Monterey.
Once you click on Get you'll be greeted with a download prompt. Click on Download then wait for the download to complete. Download times will vary based on your network speed.
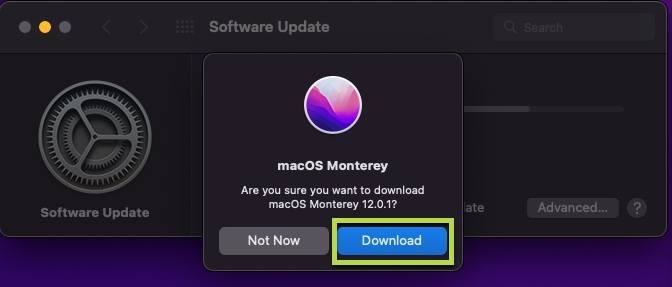
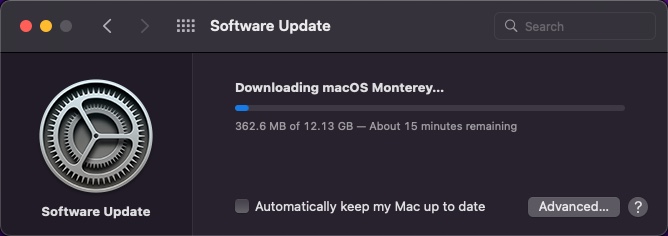
When the download is finished, you'll be prompted with the install window to Continue. However...
DO NOT CLICK CONTINUE!

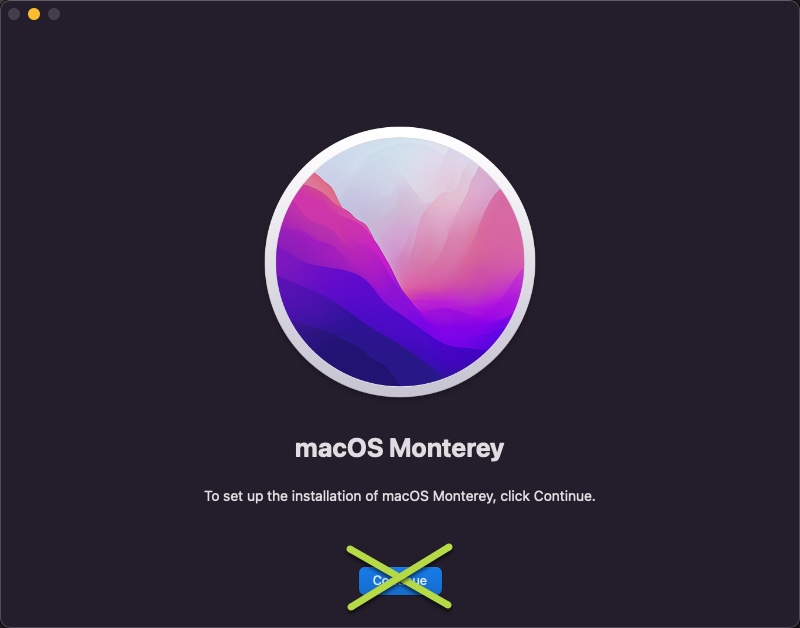
Instead, simply press Command + Q to at this install window. Once you do, simply click on Quit at the prompt to close the window.
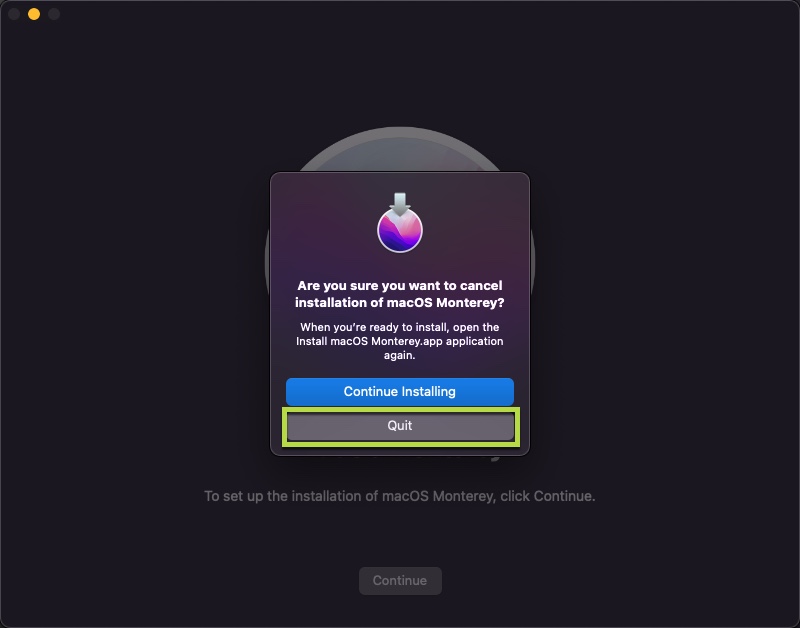
If you did everything correctly, you should now have the Install macOS Monterey.app listed in your Application Folder. This app is what we'll use to create our ISO in the next step.
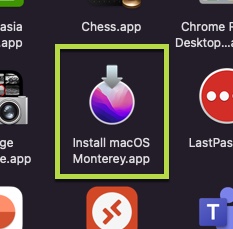
2. Mount Installer then Convert to ISO
Now that we have the Monterey App, we'll run a few commands to first mount the installer then convert it to an ISO with the purpose of mounting it to a VM in ESXi.
- Launch the terminal and run the following command.
sudo -i
Running this command will prompt for the administrator password. Once you type it in, you'll now be logged in as the root user which will be the account we'll use to execute the rest of the commands.

- From the root# prompt, enter in the following command:
hdiutil create -o /tmp/monterey -size 13800.1m -volname monterey -layout SPUD -fs HFS+J
This will create the directory /tmp/monterey.dmg
** This 13800.1m size for this guide was based on the version 12.2 of macOS and may be different for any updates/patches on future 12.x versions. **
- After this we'll need to mount the dmg using the following command:
hdiutil attach /tmp/monterey.dmg -noverify -mountpoint /Volumes/monterey
- You should see the following output below:

You should now also be able to see the mounted disk under Disk Utility.
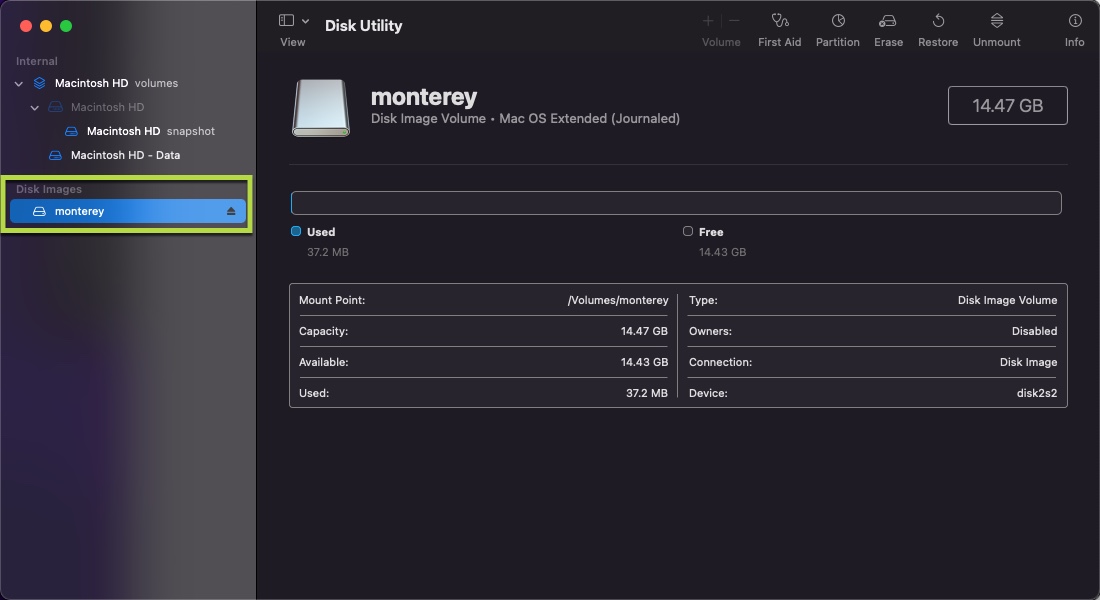
- Next we'll create the install media from our new mount with this command:
sudo /Applications/Install\ macOS\ Monterey.app/Contents/Resources/createinstallmedia --volume /Volumes/monterey --nointeraction
You should see the following result below while making the disk bootable.

- Afterwards, you can eject the attached install disk using the following command:
hdiutil eject -force /volumes/Install\ macOS\ Monterey
You should see that the install disk is ejected now.

- Next we'll need to convert the image to a .cdr with the following command:
hdiutil convert /tmp/monterey.dmg -format UDTO -o /Users/erickdimalanta/Desktop/monterey.cdr
Don't forget to change the path /Users/erickdimalanta/Desktop/monterey.cdr to your own specific path you are working out of. Once you run the command, you should now see a monterey.cdr file in your working directory that is about 14.47 GB.


Now that we have our media, we simply need to rename the file extension to a .iso. You can do so with the command below by running an in-place mv(move) command.
mv /Users/erickdimalanta/Desktop/monterey.cdr /Users/erickdimalanta/Desktop/monterey.iso
Again, make sure you set "YOUR" correct path if you are copying and pasting the command above.

3. Cleaning Up
Finally let's clean up after ourselves since leaving remnants of leftover data is just icky! 😛

We are going to clean up the initial directory where we created the monterey.dmg in the following path /tmp/monterey.dmg. Use the below command to cleanup.
rm -rf /tmp/mont*
The below screenshot shows how to simply validate and double check afterwards.

4. Upload Monterey ISO to Datastore
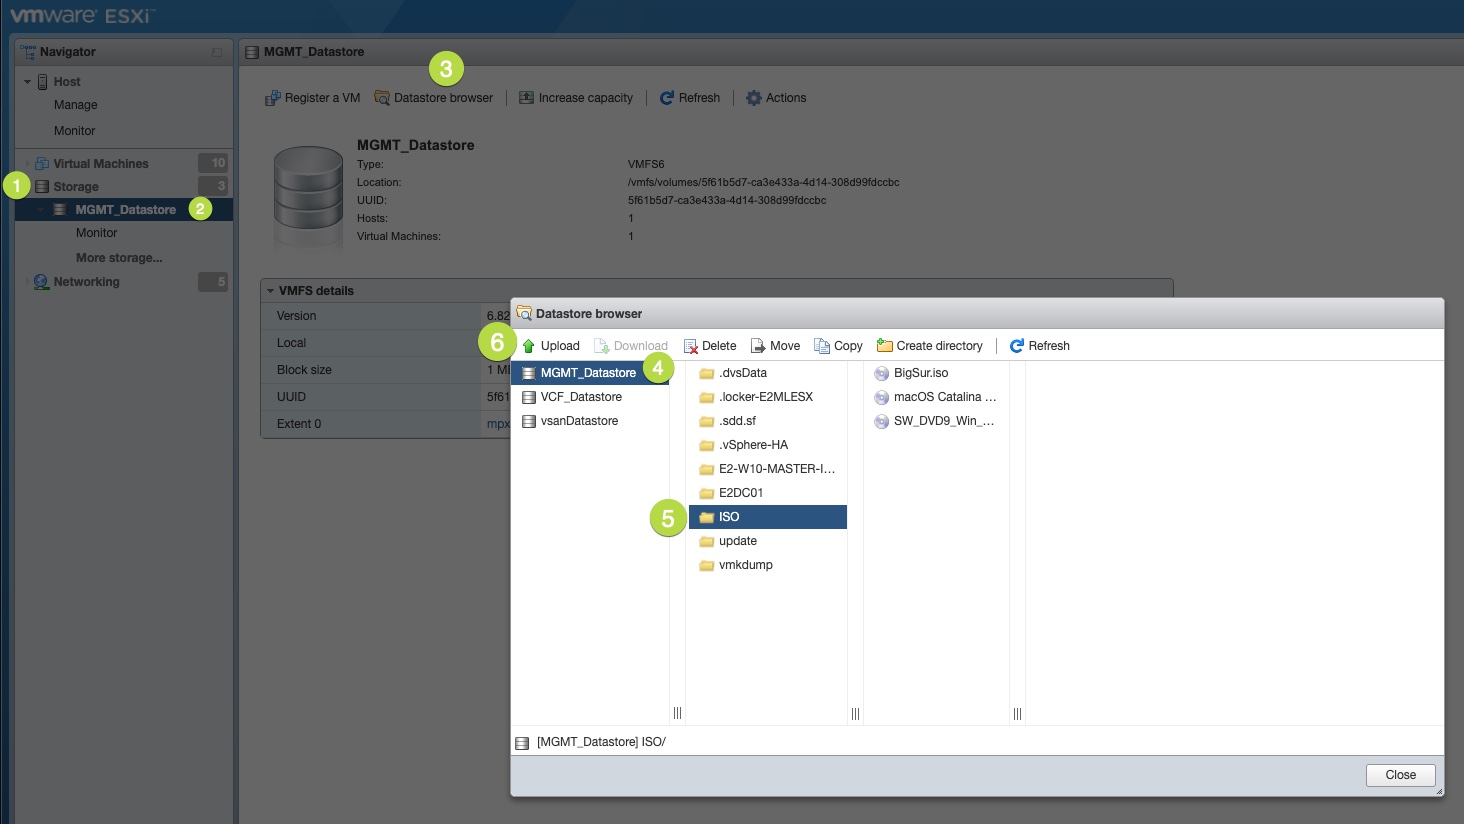
For the last step in this section, we'll need to transfer the newly created Monterey.iso to our VMware environment. You can upload it to a datastore or Content Library if you are also running a vCenter. To keep it simple, I'll showcase uploading it to a datastore.
- Login to your ESXi host
- Navigate to Storage and select the Datastore you want to place the .iso in.
- Click on Datastore Browser
- Select the Datastore
- Select the folder you'll place the .iso in. I'll use the ISO folder.
- Then click on Upload
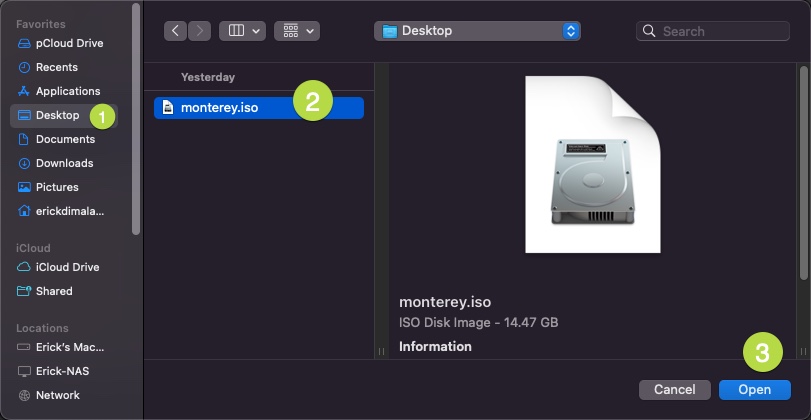
Navigate to the directory where you created the monterey.iso. Select the monterey.iso and click on Open.
Review the Recent Tasks pane, do a run around the block, then monitor to completion.

macOS Unlocker Installation
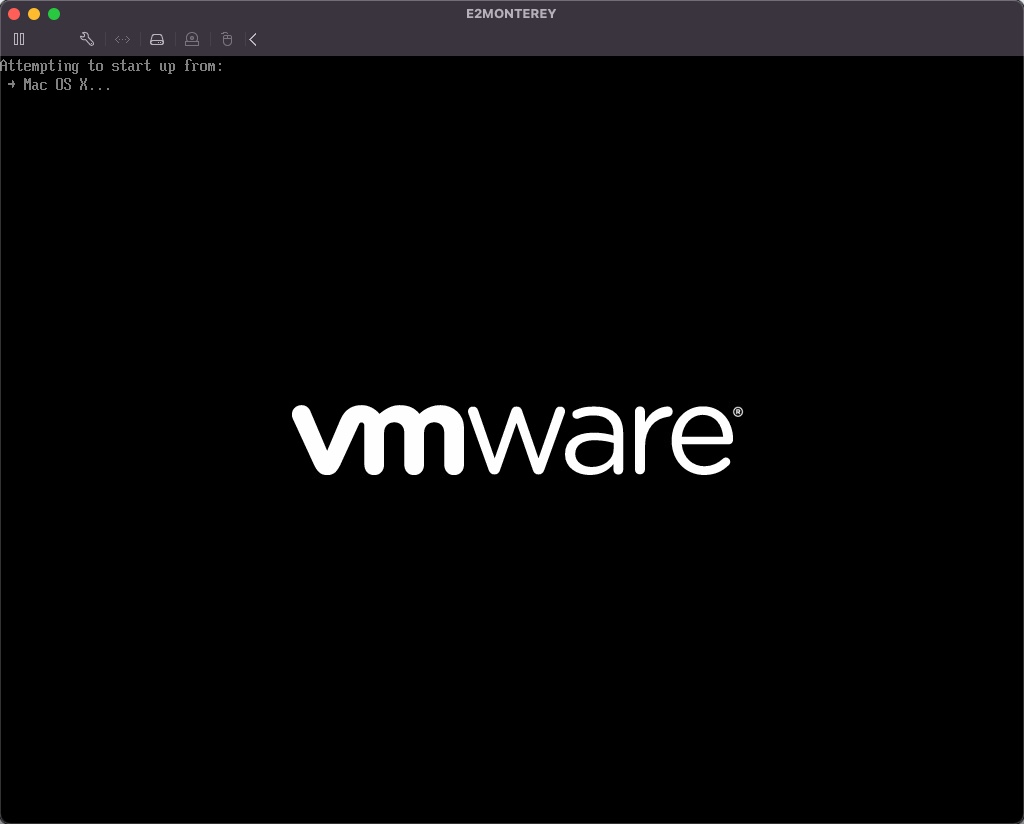
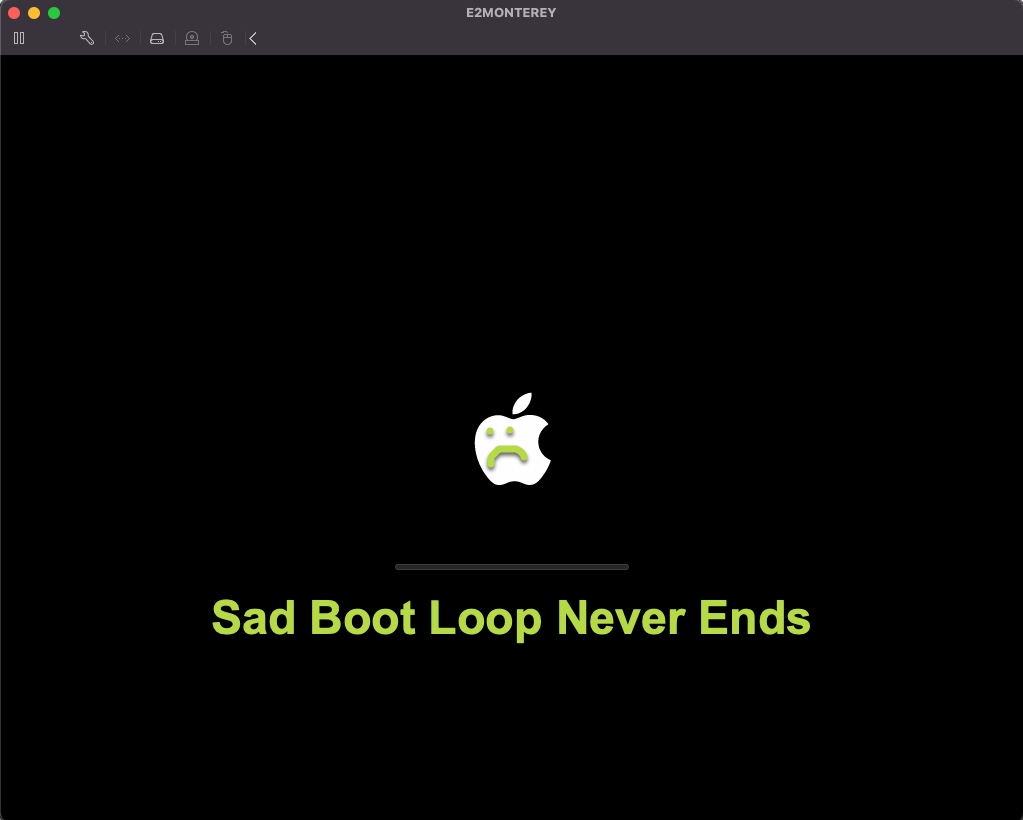
Once the .iso is finally uploaded to the datastore, it's now time to prep our ESXi host with the ability to run macOS in a VM. The unlocker is written python that modifies the vmware-vmx file to allow macOS to boot. Without this unlocker, the machine simply doesn't work and is suck in a sad infinite boot loop.
1. Download the Unlocker
You'll first need to download the unlocker zip file here.
The above link should be a direct download to the unlocker from github. The file name is esxi-unlocker-master.zip.
2. Upload to Datastore
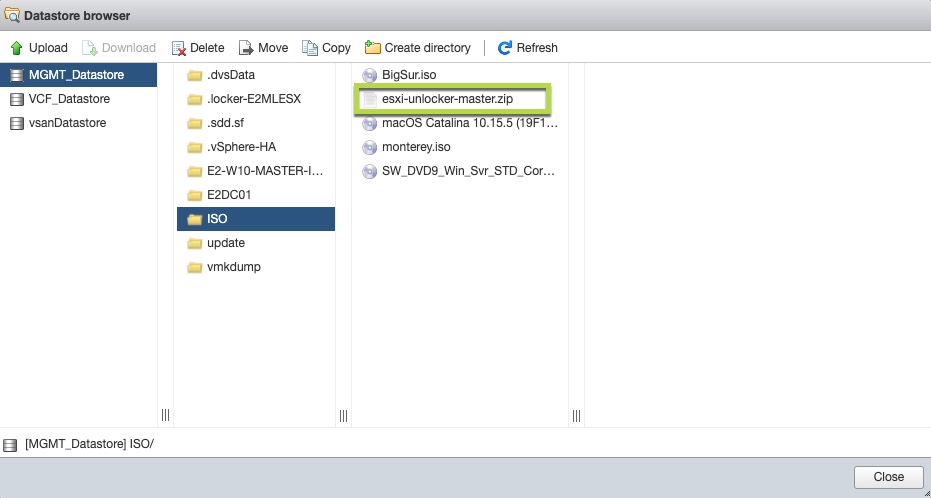
Once you've downloaded the esxi-unlocker-master.zip, you'll need to upload this to the same location we uploaded the monterey.iso in a previous step above.
3. SSH into ESXi host to Install the Unlocker
Bring up your terminal if you've previously closed it and SSH into your host.
- Make sure you enable SSH on your host if disabled. -
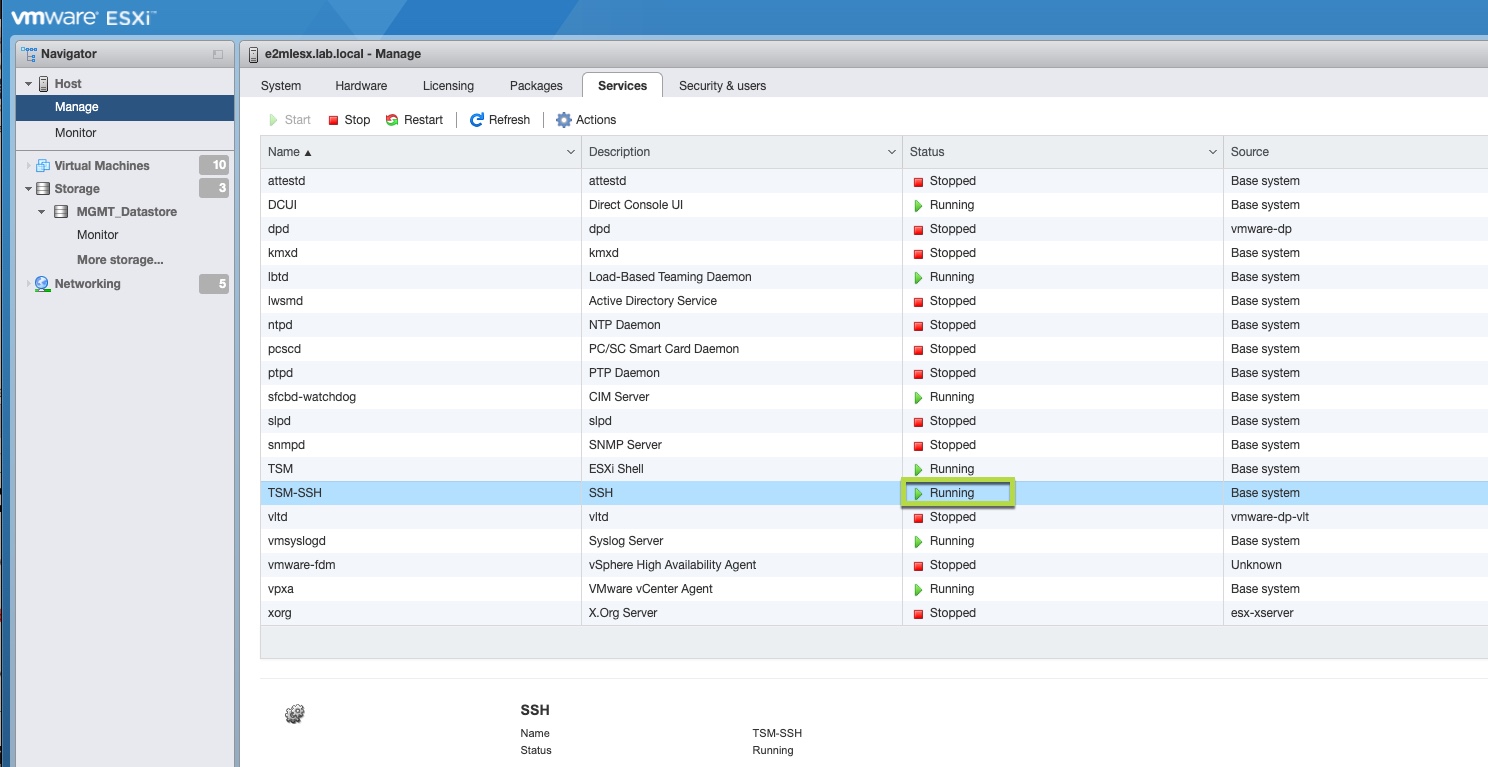
From there, login to your ESXi host then navigate to your unlocker location as shown by the screenshot below.
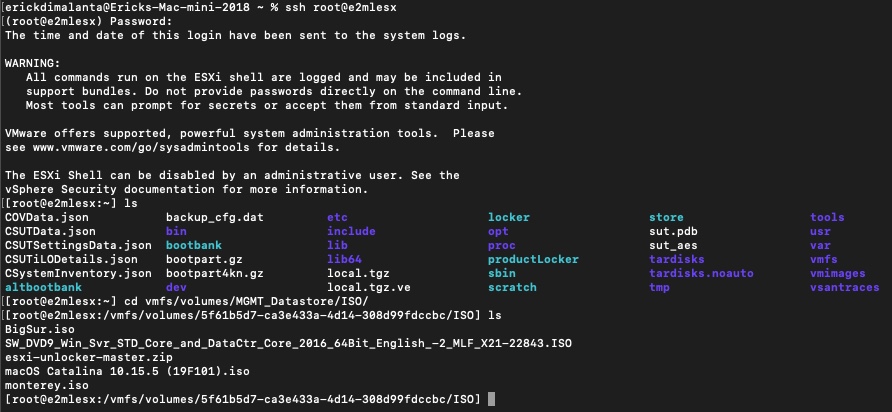
- Once in the parent location of the unlocker, we'll need to unzip the esxi-unlocker-master.zip file. You can do so with the command below:
unzip esxi-unlocker-master.zip
The below image should be your resulted output.

4. Set permissions on the extracted folder
Before we navigate to the newly extracted folder and install the patch. We'll need to set the permissions on the folder and files within. Not doing so will result in a "Permission denied" error as shown below.
So since I'm here to save you the headache so that this install guide works the first time.
- Enter the following command below:
chmod 775 -R esxi-unlocker-301/
This command will grant permissions to the folder and all the files recursively within.

5. Install Unlocker Patch
Once you've set the permissions on the folder and files above, we can now install the patch. First navigate to the extracted folder that contains all the files necessary for the patch.
- Enter in the following command:
cd esxi-unlocker-301/

Once there, we can actually use a patch validation checker to make sure the patch is installed or not. I know we haven't installed the patch yet, but let's just run that first to see the resulted output.
- Run the following command to validate:
./esxi-smctest.sh
After running the command, it will obviously show false since we've not yet installed the patch. Well let's do it now!
- Run the following command to install the patch:
./esxi-install.sh

Once you've run the install ./esxi-install.sh, we'll need to now restart the server for the configuration changes to take effect.
**Make sure you have no running VMs before typing reboot. 😛**
In the same terminal window, you can simply type reboot then press Enter.
reboot

6. Validate Successful Patch Install
When the ESXi host is back up from it's reboot, let's SSH into the host again and navigate to the same location where we ran the patch installer.
Once there run the validation command again to now see a different result.
./esxi-smctest.sh
This should now display smcPresent = true which means we are now ready to install macOS without running into any boot issues.

macOS 12 Monterey VM Install
Whew! It's about time amirite?

If you've followed the above steps correctly, you should now be able to continue on and install Monterey!
1. Create a New Virtual Machine
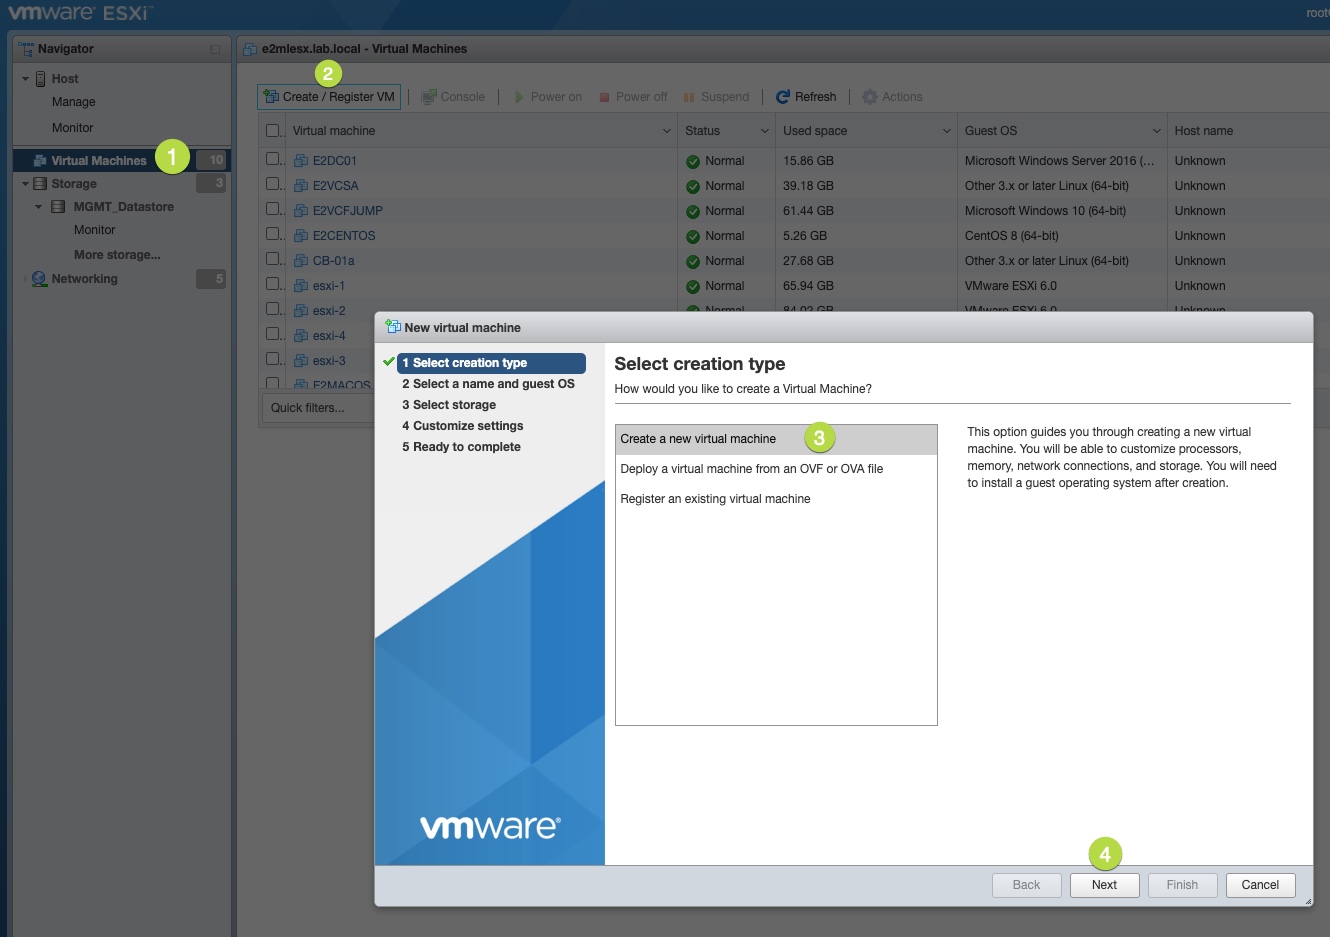
Go back to your ESXi host and navigate to the Virtual Machine menu item on the left. Then click on Create / Register VM.
Another screen will pop up. From there select Create a new virtual machine and click on Next.
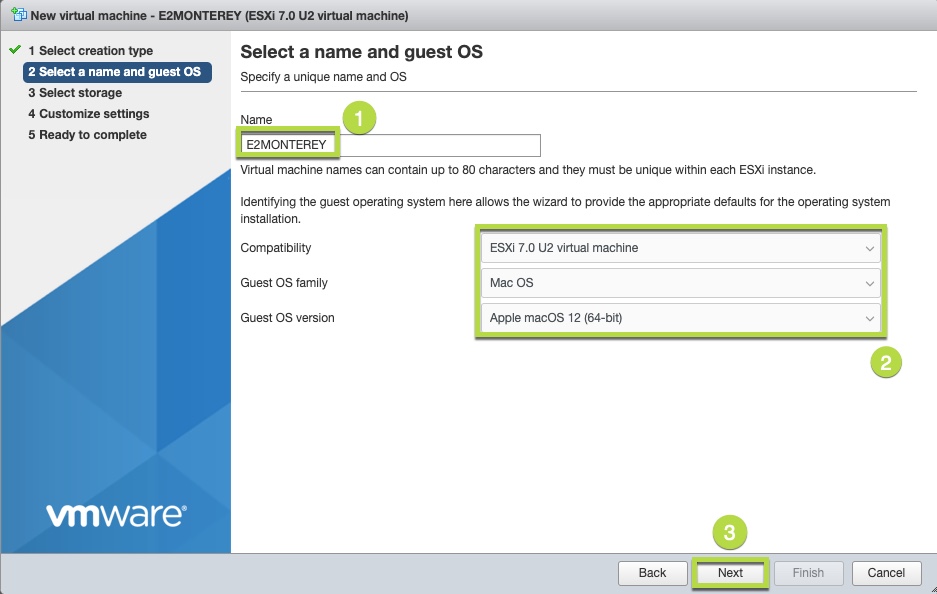
Next, type out a name for your new VM. Select the following options from the drop down menu for the rest of the categories.
- Name: ANY NAME SHORTER THAN 80 CHARACTERS
- Compatibility: ESXi 7.0 U2 virtual machine (U3 wasn't available despite being on U3)
- Guest OS Family: Mac OS
- Guest OS version: Apple macOS 12 (64-bit)
Finally, click Next when finished.
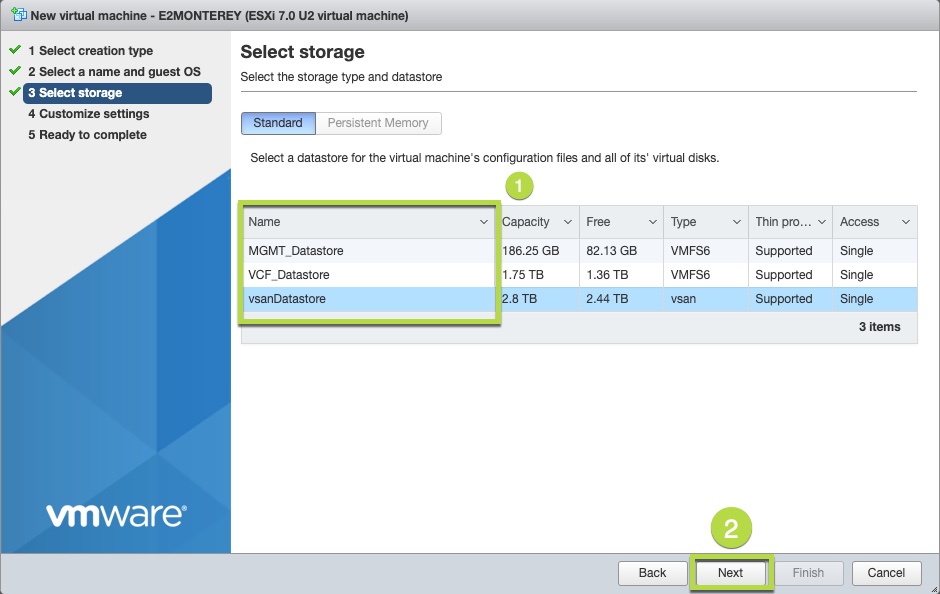
From here, select which datastore you'll want to place your machine in.
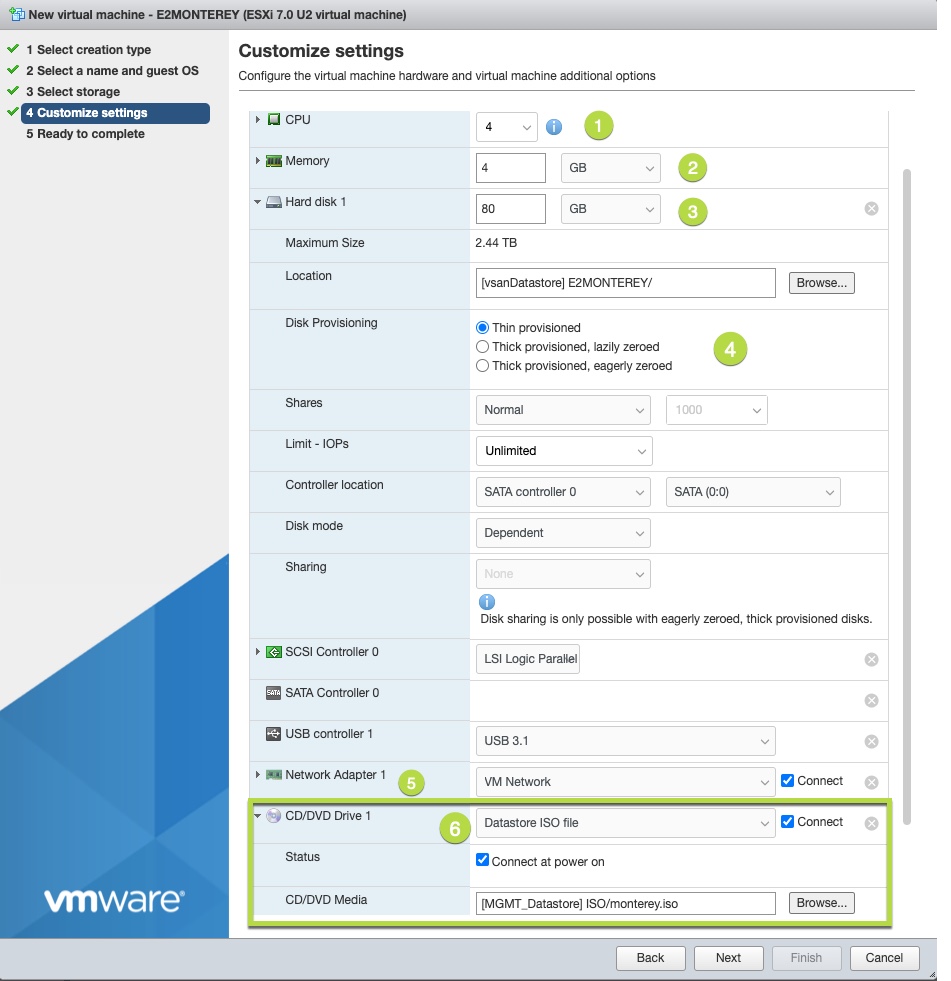
The next option will be to configure the hardware specs of the VM.
You are going to want to set your CPU, Memory, Storage size, type of provisioning, Network, and most importantly configure your CD/DVD Drive 1 to boot from the monterey.iso we've created. This is located in the ISO folder on the datastore we uploaded it to in an earlier step.
Click on Next once done.
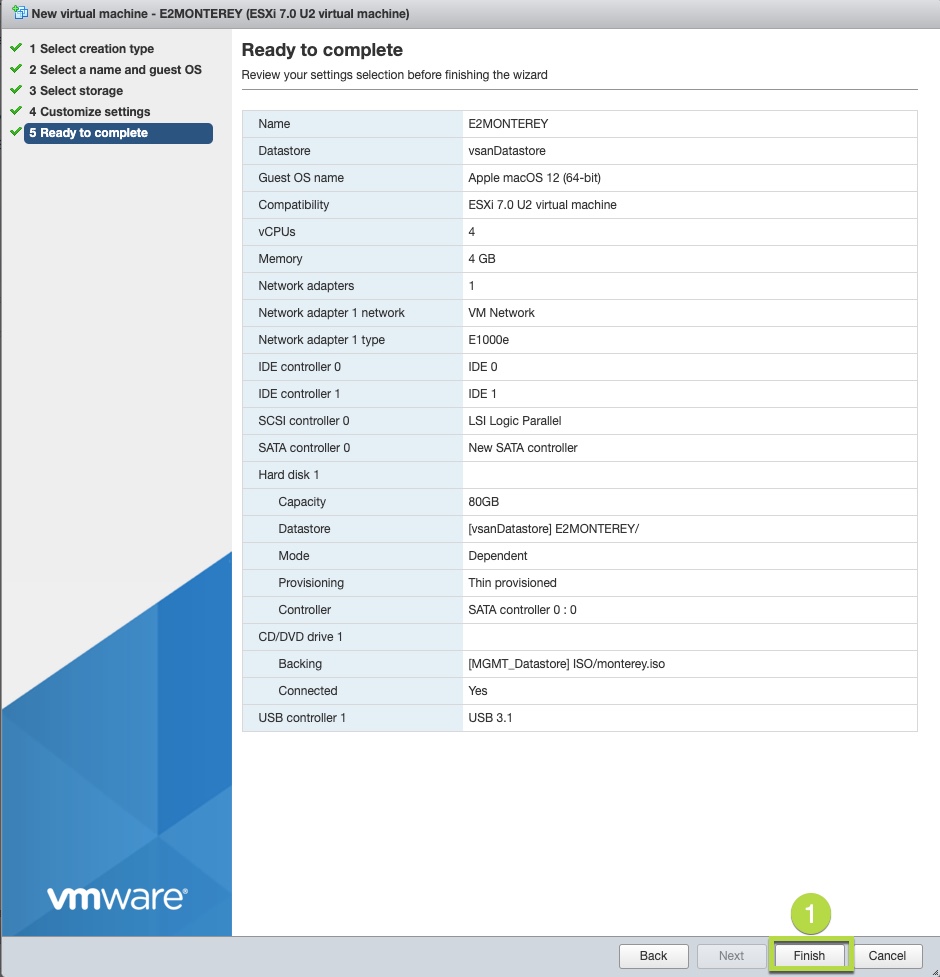
Finally, confirm all your settings are what you want, then click on Finish when complete.
2. Power On VM & Format VM Storage
Sweet! Now that you are done creating your VM, let's power this bad boy on to see if it bypasses the boot loop error since we applied the Unlocker patch.
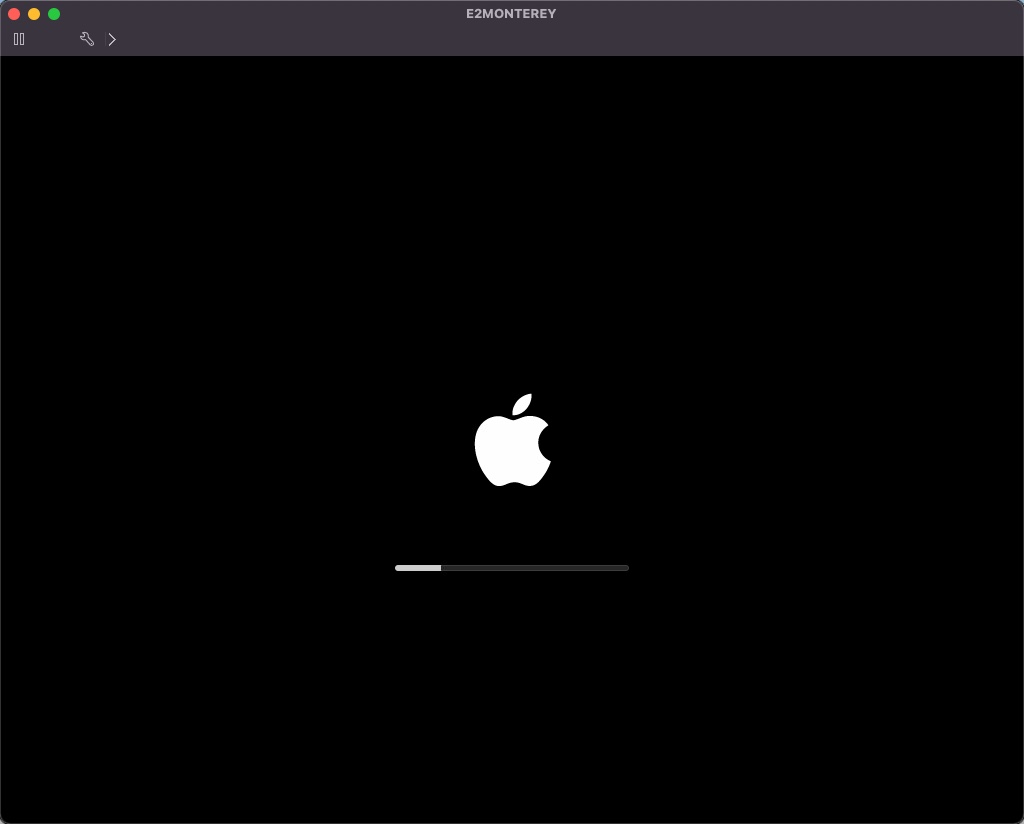
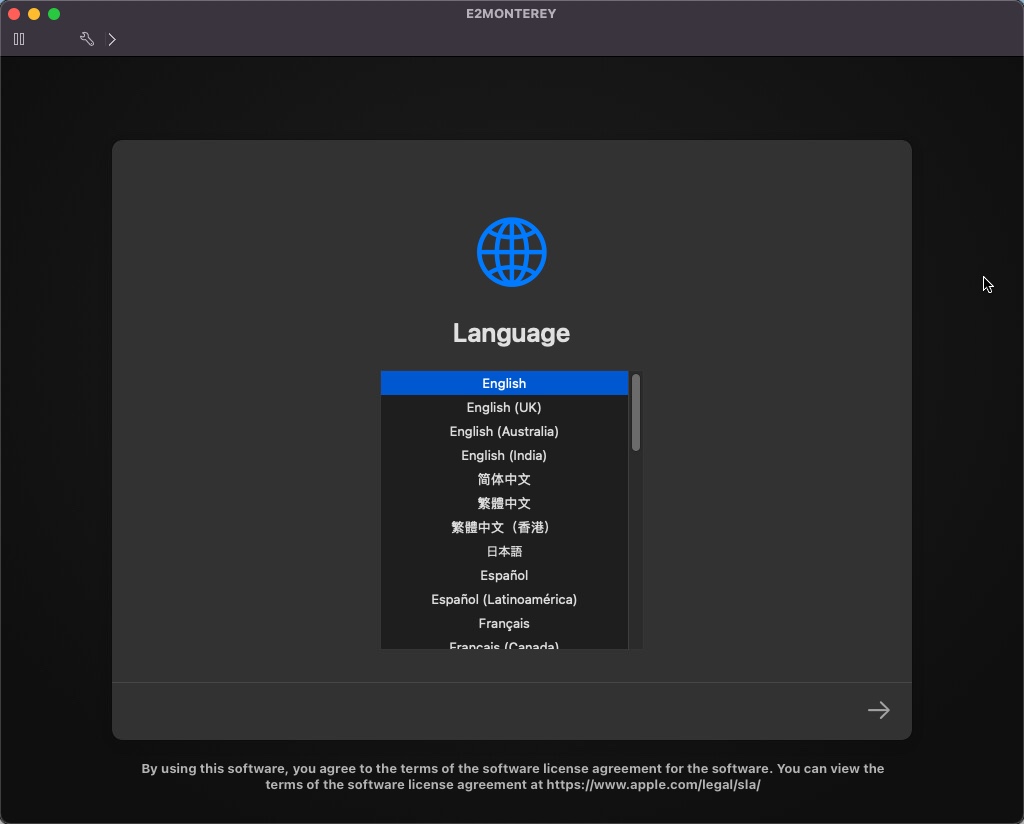
Boom! Success! Boot loop is no more!

Anyway, continuing on with the install. Select your language of choice and click on the bottom right arrow. Next we'll need to format the newly provisioned disk so that macOS can recognize the storage to install itself onto.
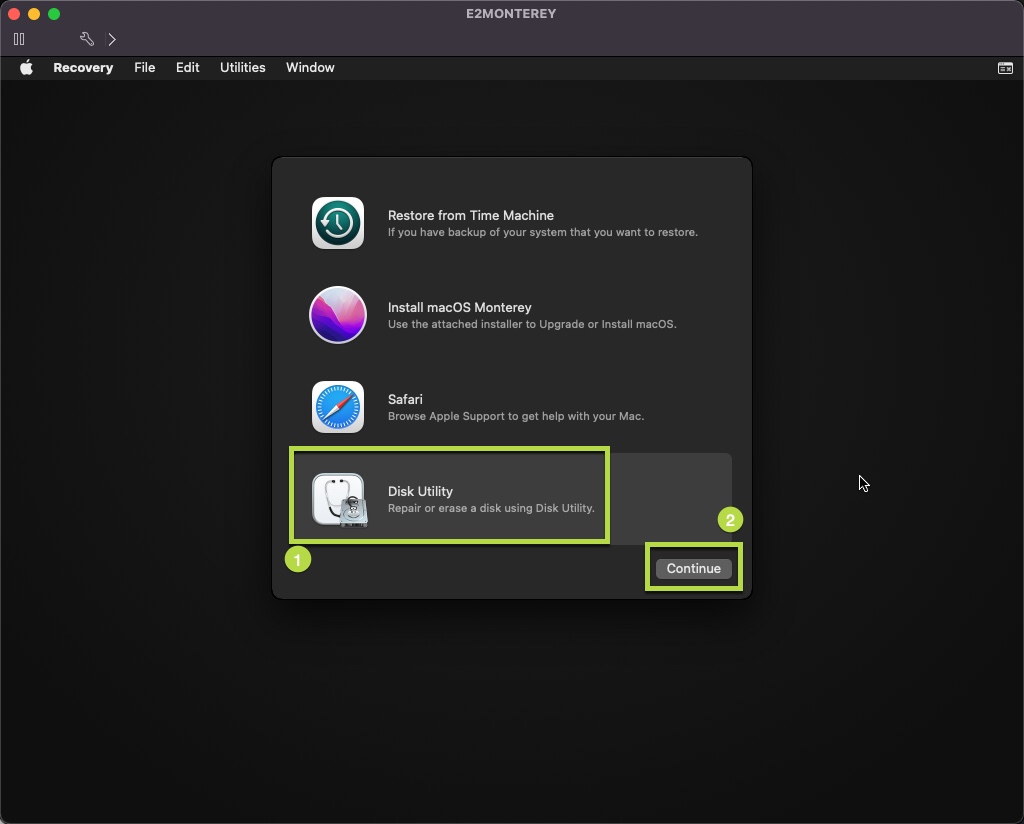
- Select Disk Utility and click on Continue.
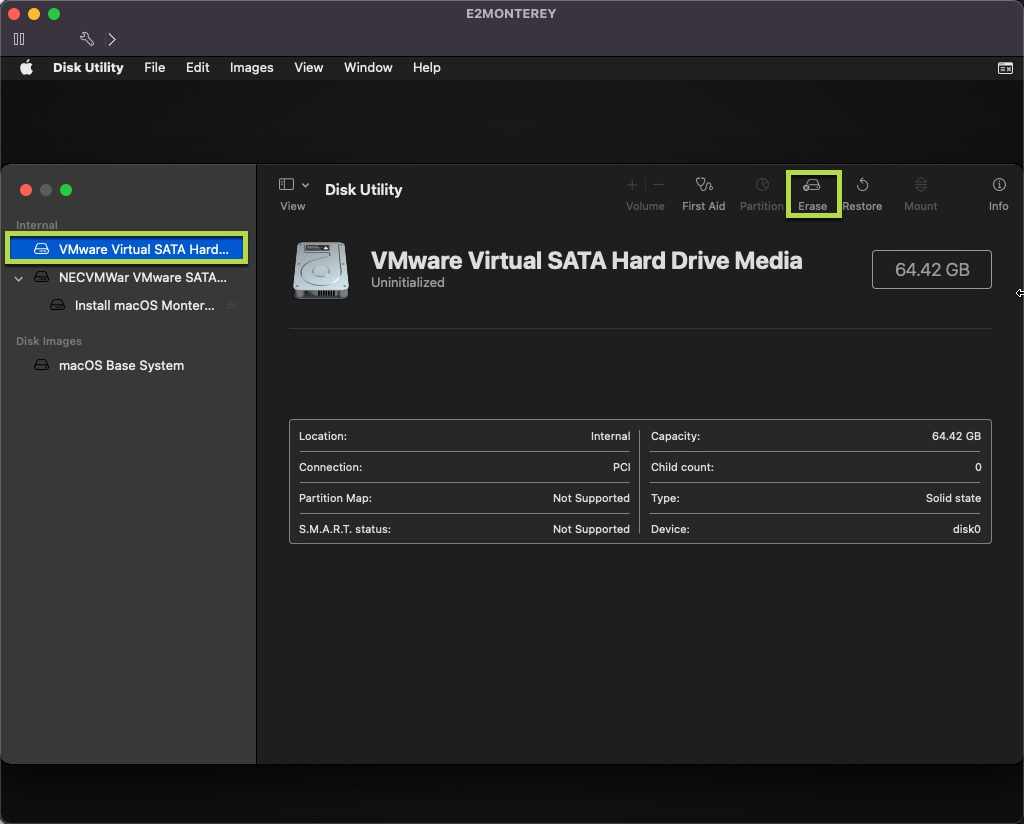
- Next, highlight the VMware Virtual SATA Hard Drive Media and click on the Erase option at the top.
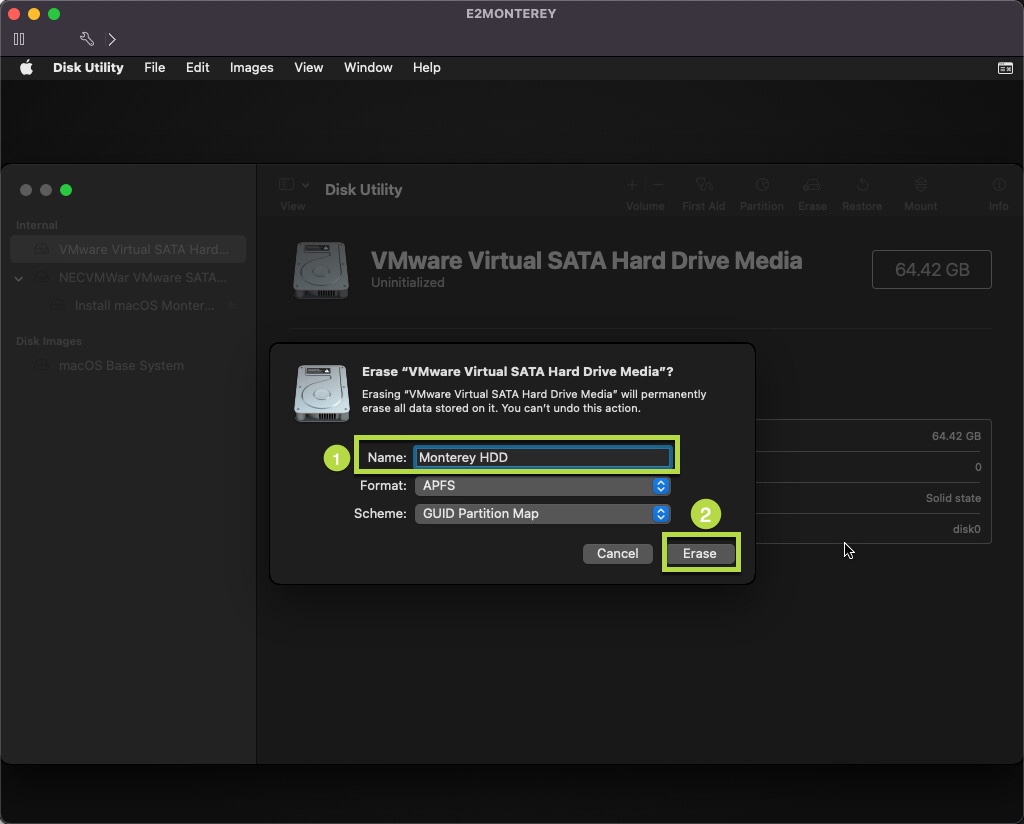
Enter in a Name to label your disk and keep the defaults for Format - APFS and Scheme - GUID Partition Map.
- Click the Erase button when ready
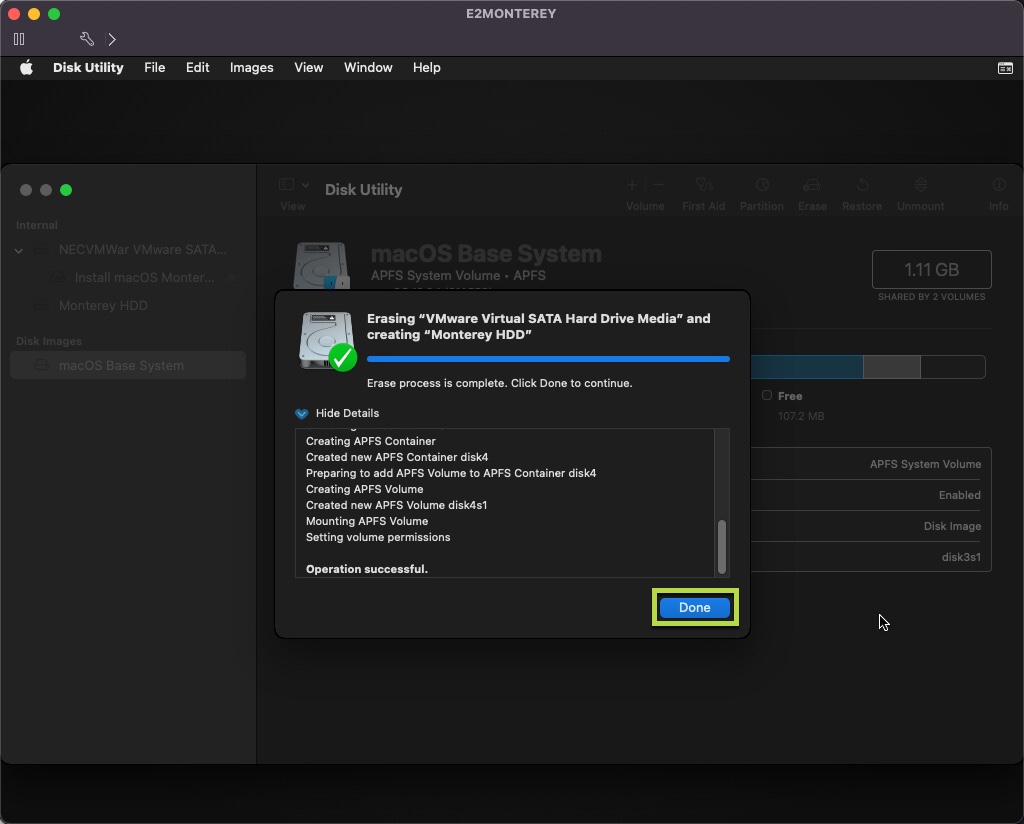
- The formatting process will proceed. Once complete, click Done.
- We can now quit Disk Utility by navigating to the top menu and clicking on Disk Utility > Quit Disk Utility.
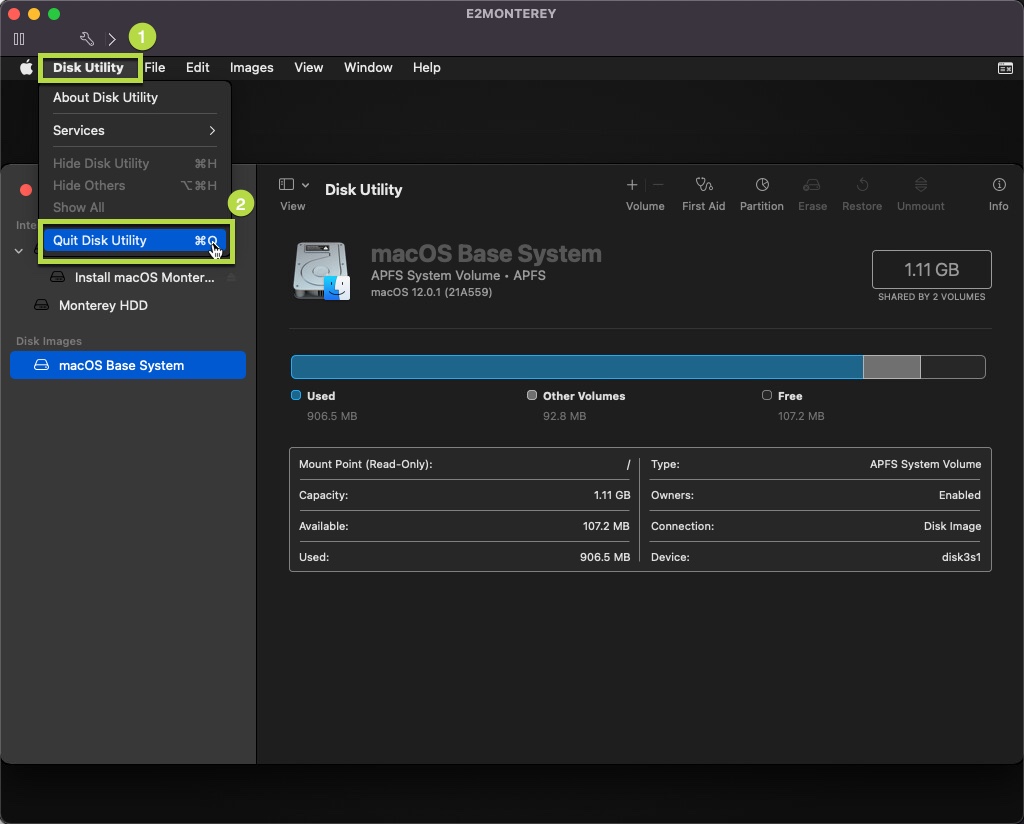
3. Install macOS 12 Monterey
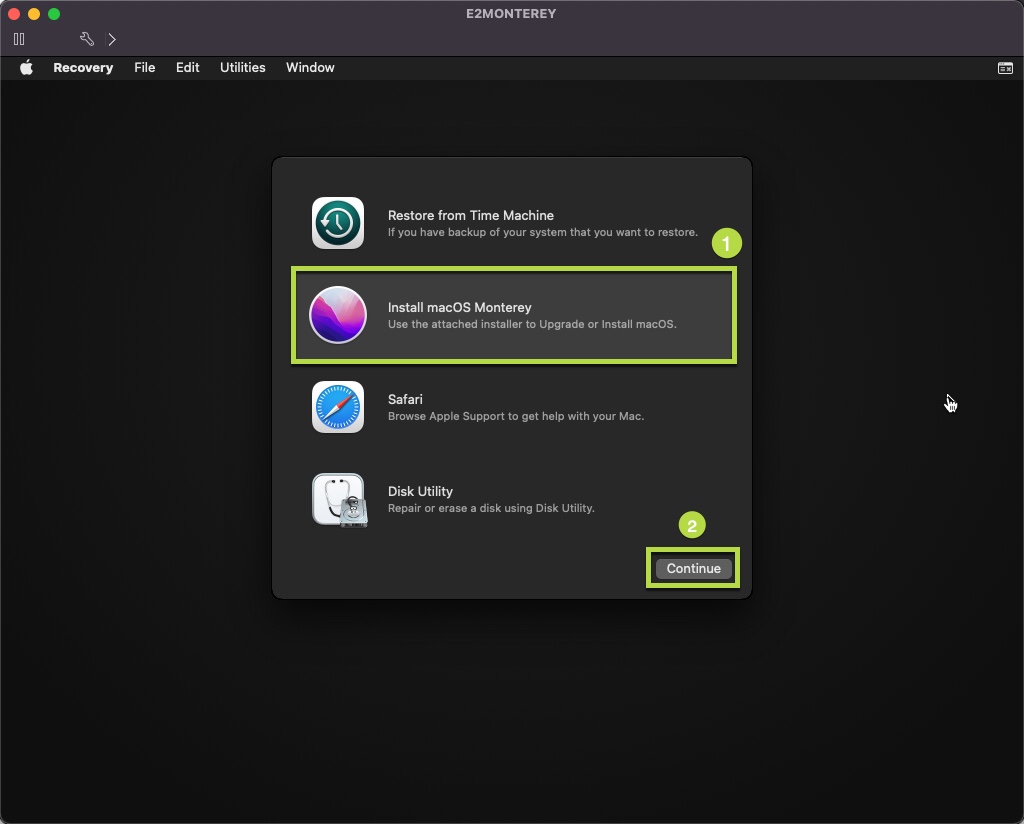
- Now we can install the OS. From here select Install macOS Monterey then click on Continue.
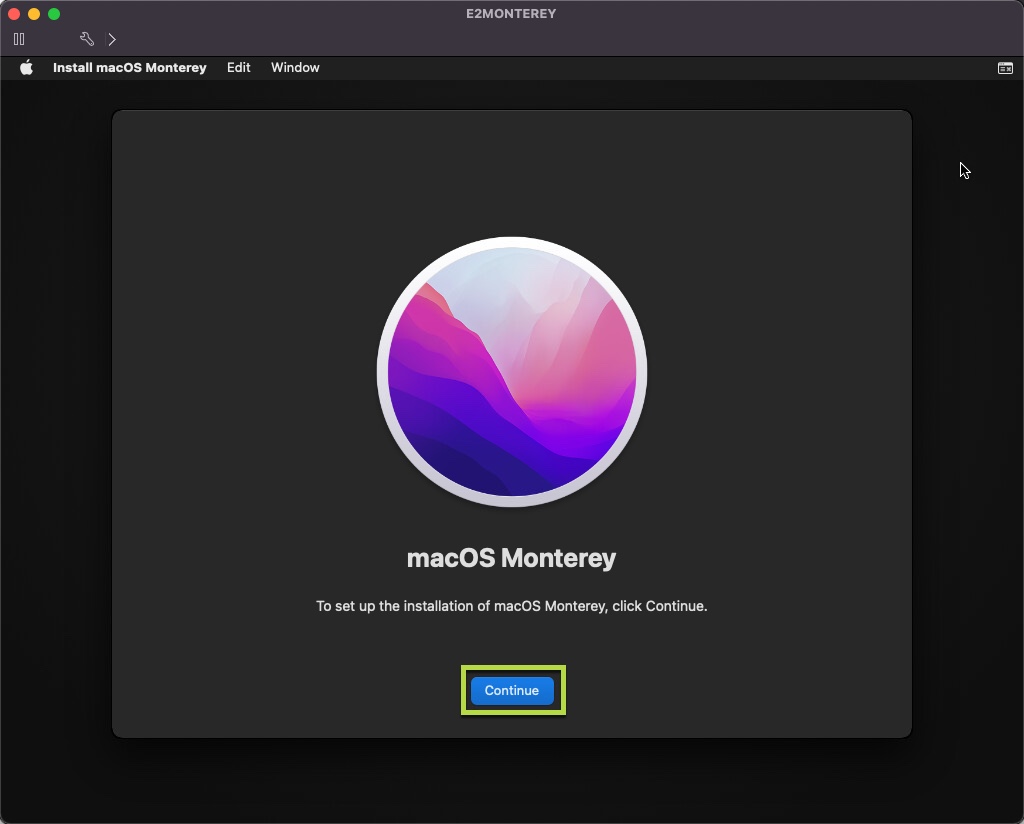
- On the next screen click Continue
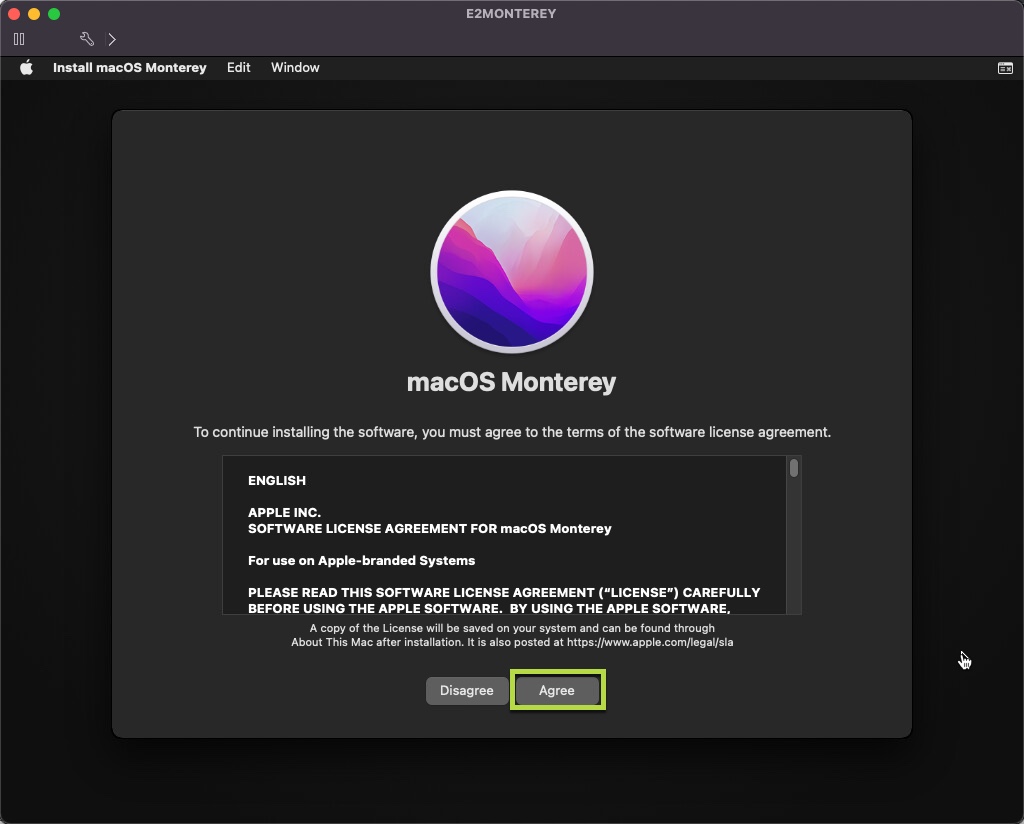
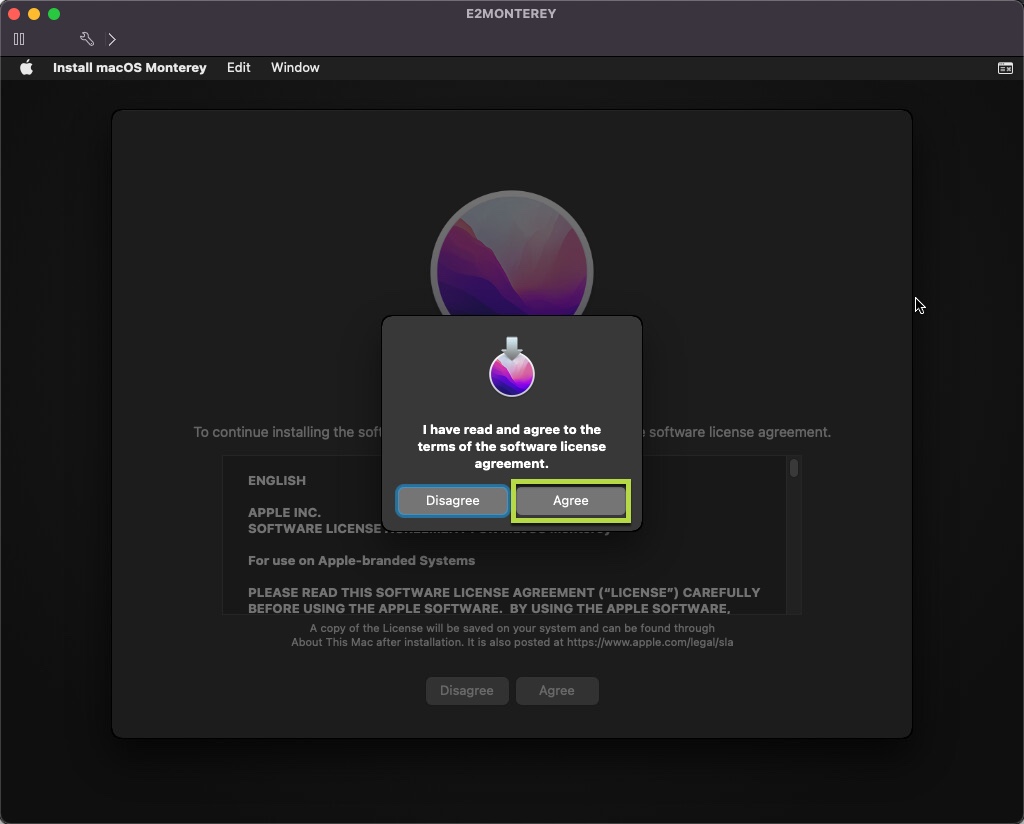
Click Agree twice for the Software License Agreement
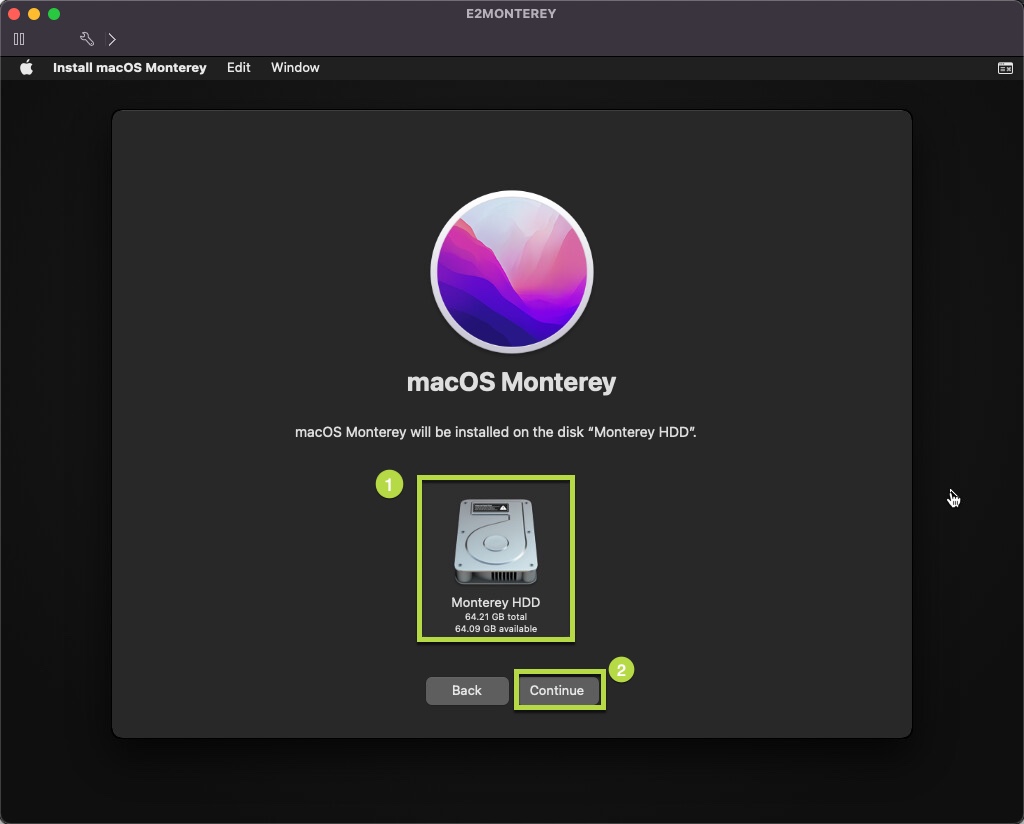
Click on the newly formatted HDD then click on Continue.
macOS Monterey will start to install now...
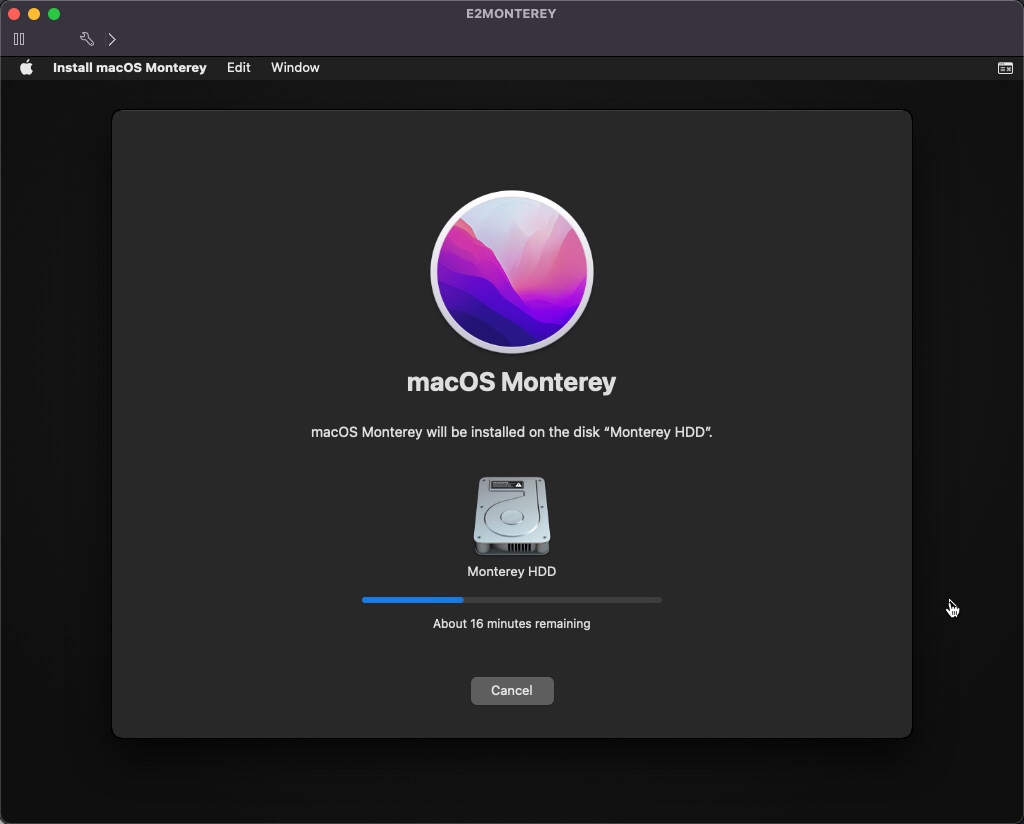
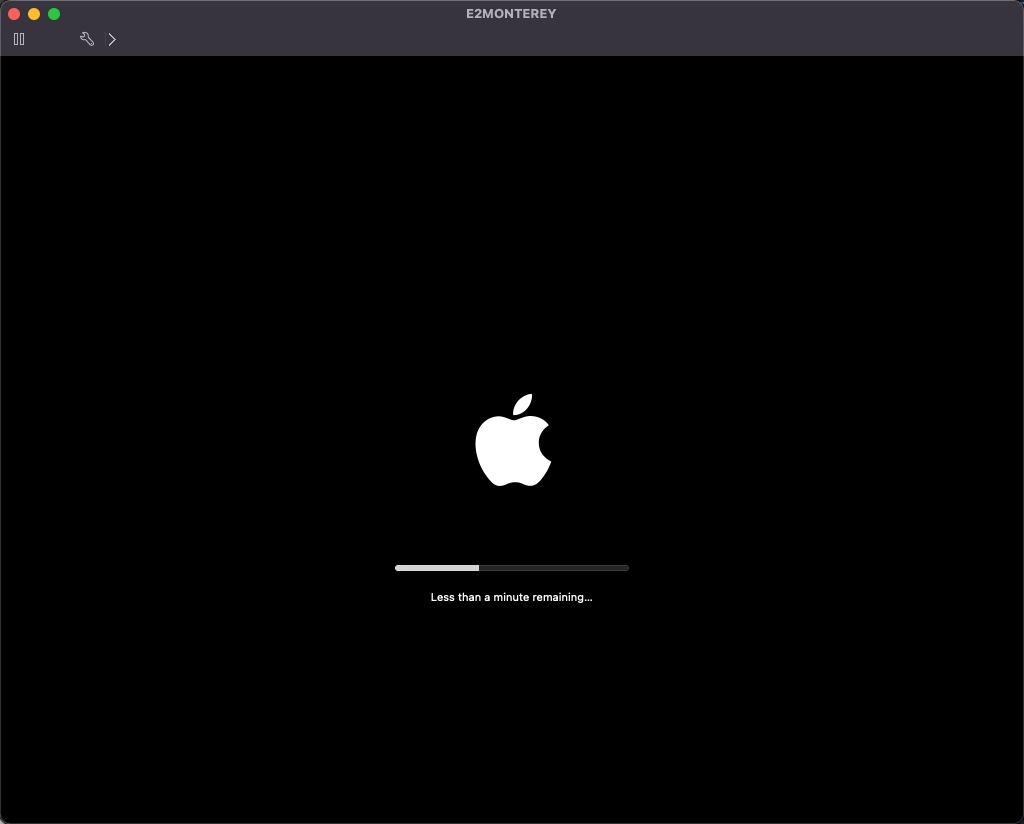
Don't believe the time remaining is even close to accurate. I would go bake a frozen pizza and watch a movie or something, then come back waaaayyyyy later. 😛
When the never ending string of installation reboots are completed, the install will be complete! Again, I won't go through this self-explanatory setup wizard.
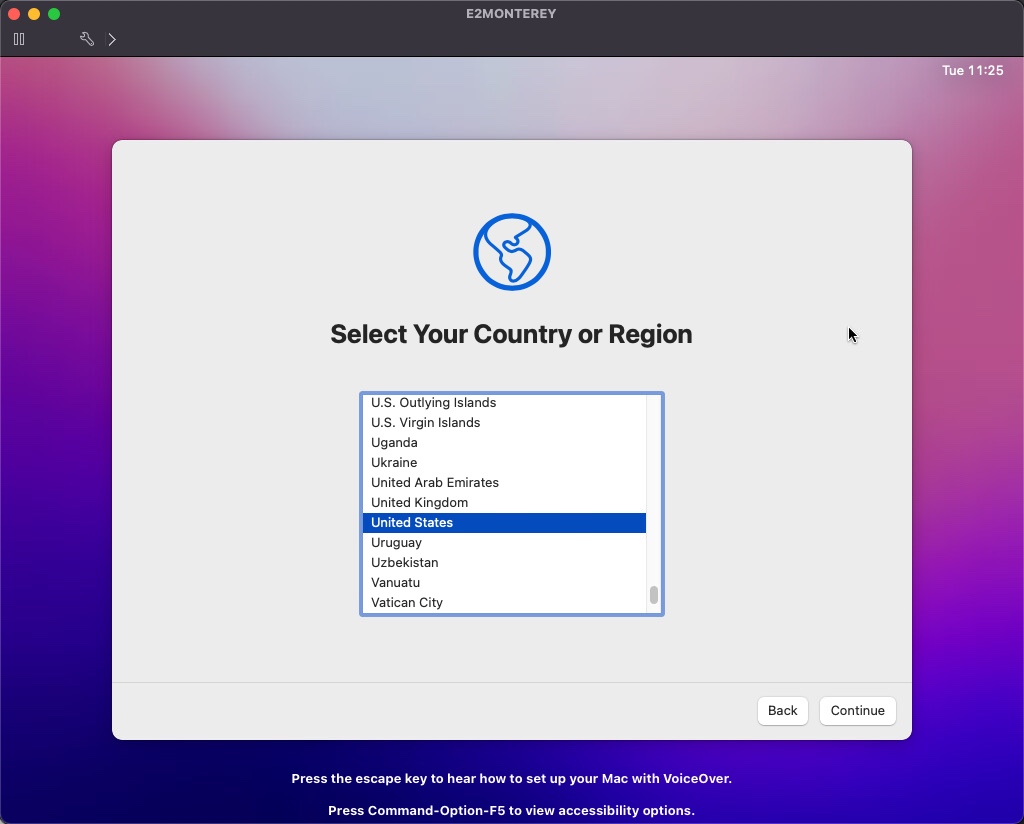
Install VMware Tools (Optional but necessary)
Finally, the last thing to do after you've gone through the initial OS setup wizard, is to install VMware tools. You can also unmount the monterey.iso from the VM at this point since it's no longer needed.
Wut the heck are VMware tools?
1. VMware Tools Error 21001
You'll likely receive the below error when attempting to mount the VMware Tools from the host.
Failed - The required VMware Tools ISO image does not exist or is inaccessible.

This occurs because the darwin.iso doesn't exist in the directory "/usr/lib/vmware/isoimages." Which is fine as these are the iso images that shipped with this version of ESXi that I installed. According to the KB 2129825 we have a few options in resolving this. I'm going to simply go with the option to download the latest VMware tools for this specific OS.
2. Download VMware Tools
- Make sure you are logged into your Customer Connect account. Then click Here to Download the latest VMware Tools. I selected the .zip option.
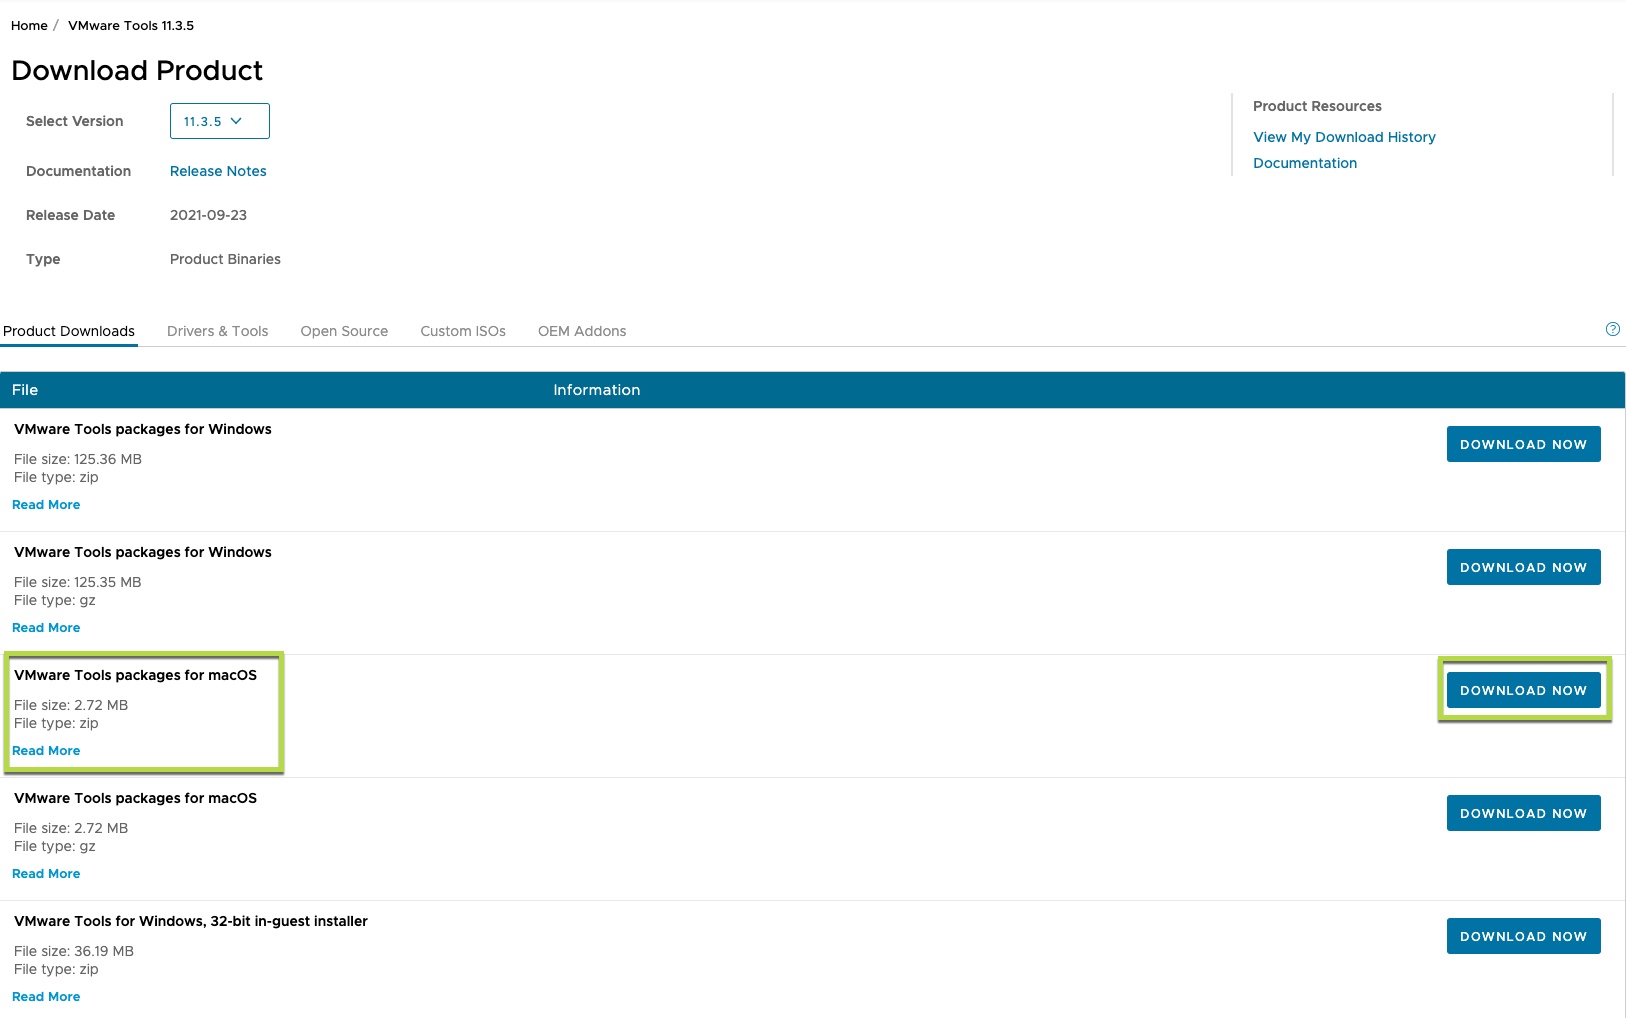
Next, navigate to your download location and extract the .zip. On macOS you can simply double-click the file to extract.
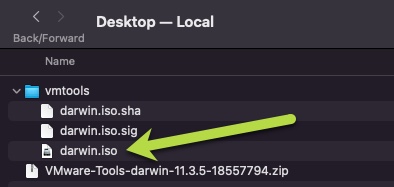
Sweet! Now you should have the darwin.iso image we need to install VMware Tools onto our macOS 12 Virtual Machine.
3. Mount VMware Tools ISO to VM
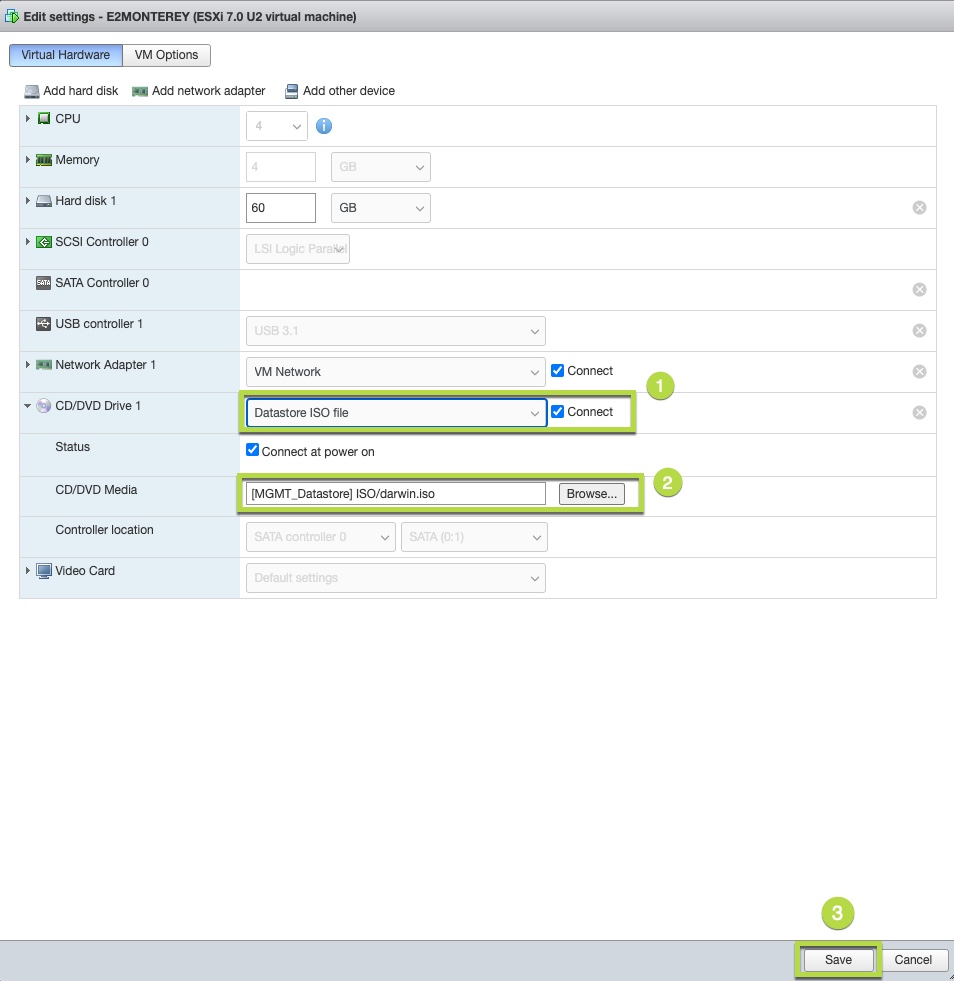
Now that we have the VMware Tools image for macOS, we'll need to upload the .iso to a datastore the same way we Uploaded the monterey.iso in an earlier step.
Once the iso is uploaded there, Edit settings on the VM and select the darwin.iso to mount just like we did when we were creating the VM. When done, click Save.
So...who in the heck is Darwin?
4. Install VMware Tools in Monterey
Next we'll hop back over to our VM and we can now see that VMware Tools is mounted and ready for install.
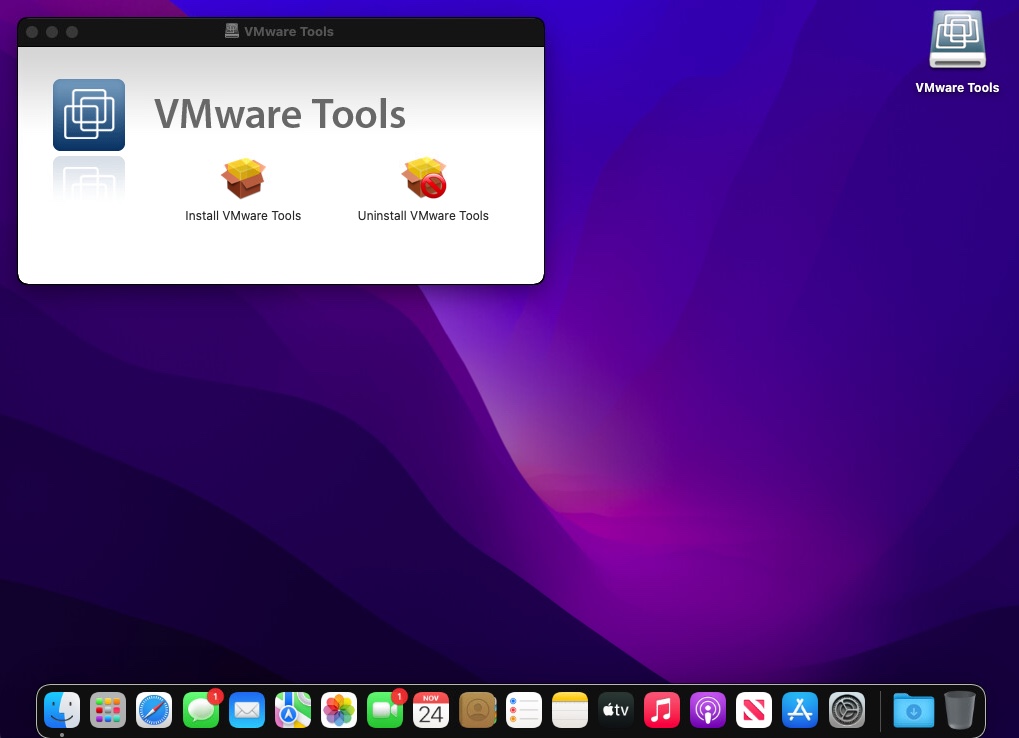
Double click on the Install VMware Tools icon. From there the Tools installer will launch. Click on Continue to proceed.
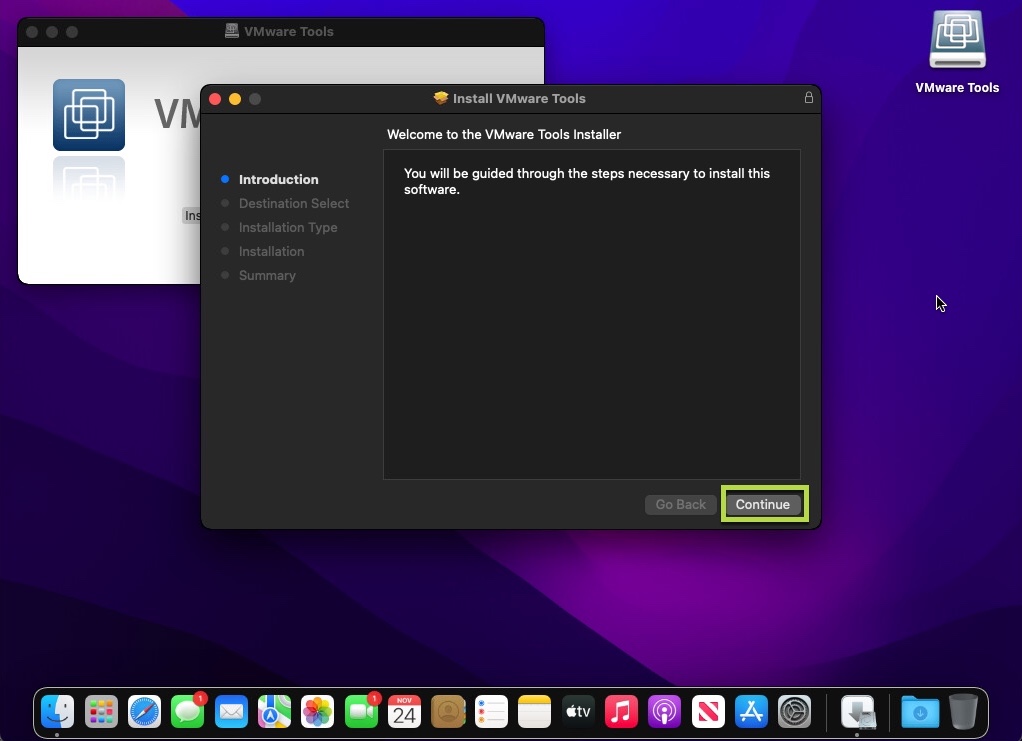
Click Install on the next screen
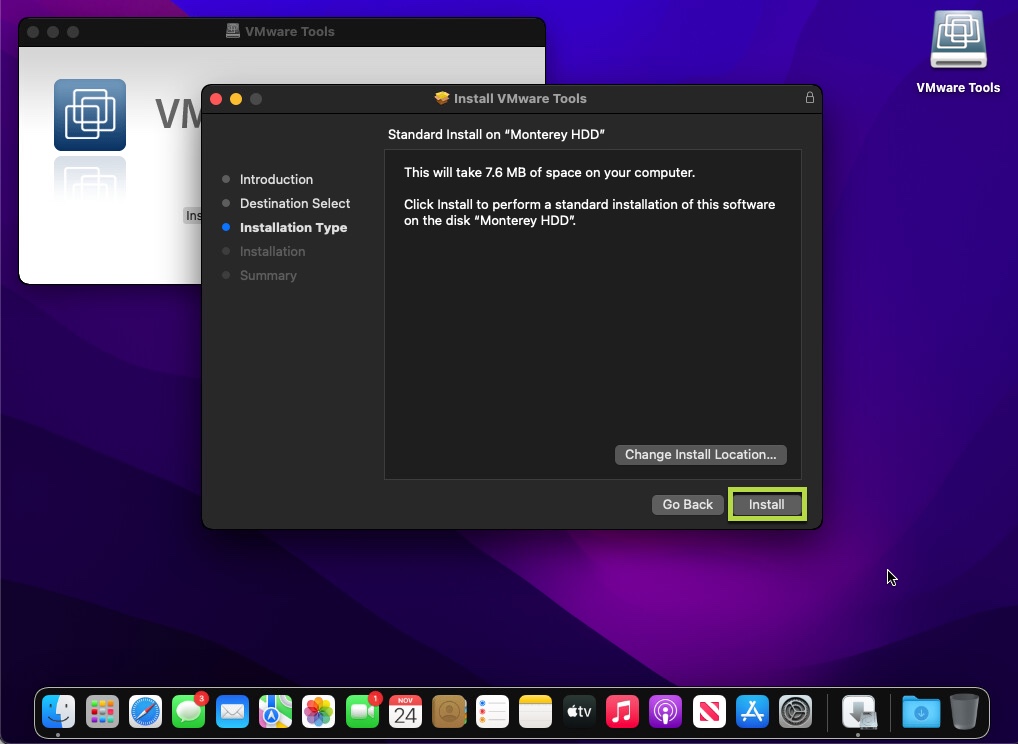
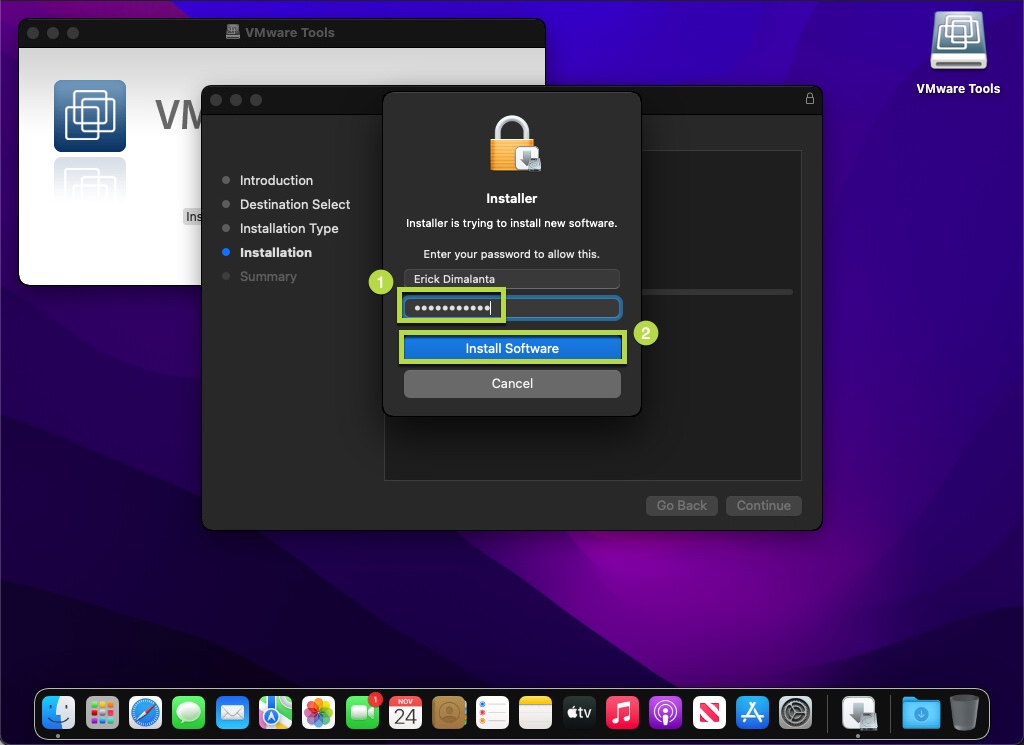
You'll then be prompted to enter in the password you set when you went through the initial OS setup wizard. Once done, click on Install Software. Then click OK on the administer prompt.
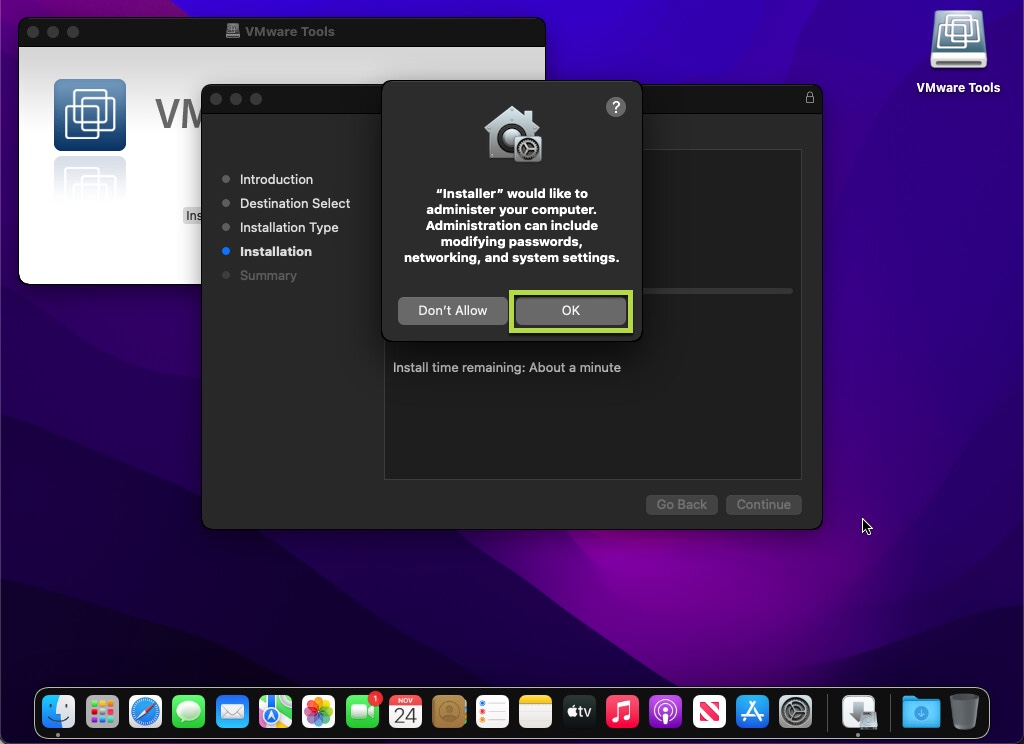
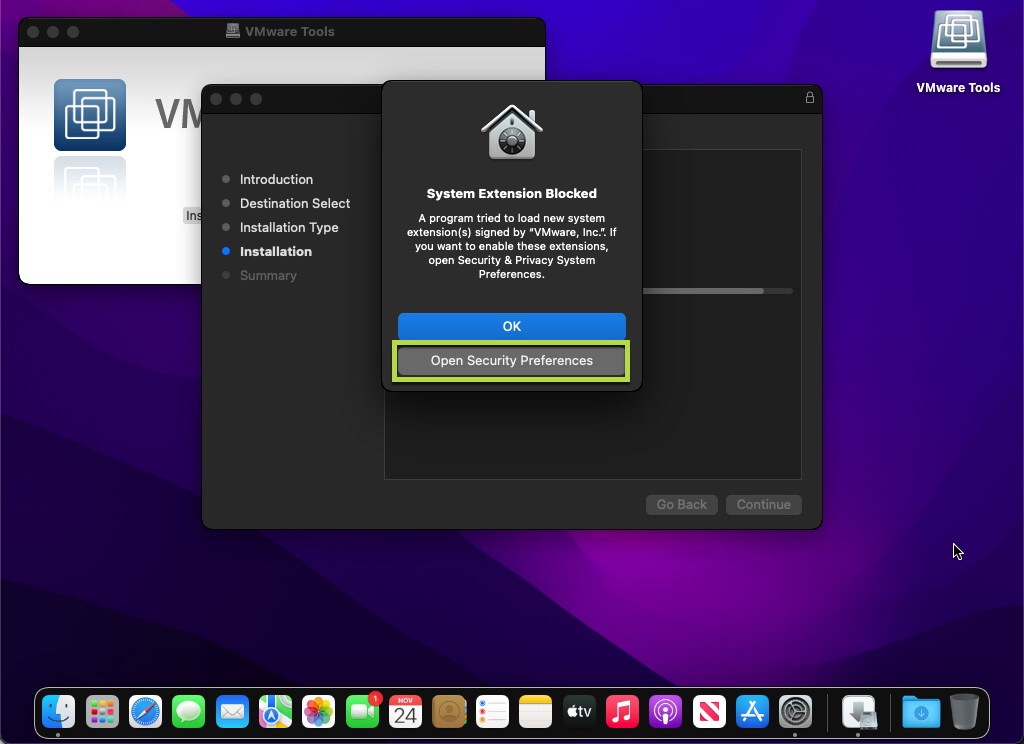
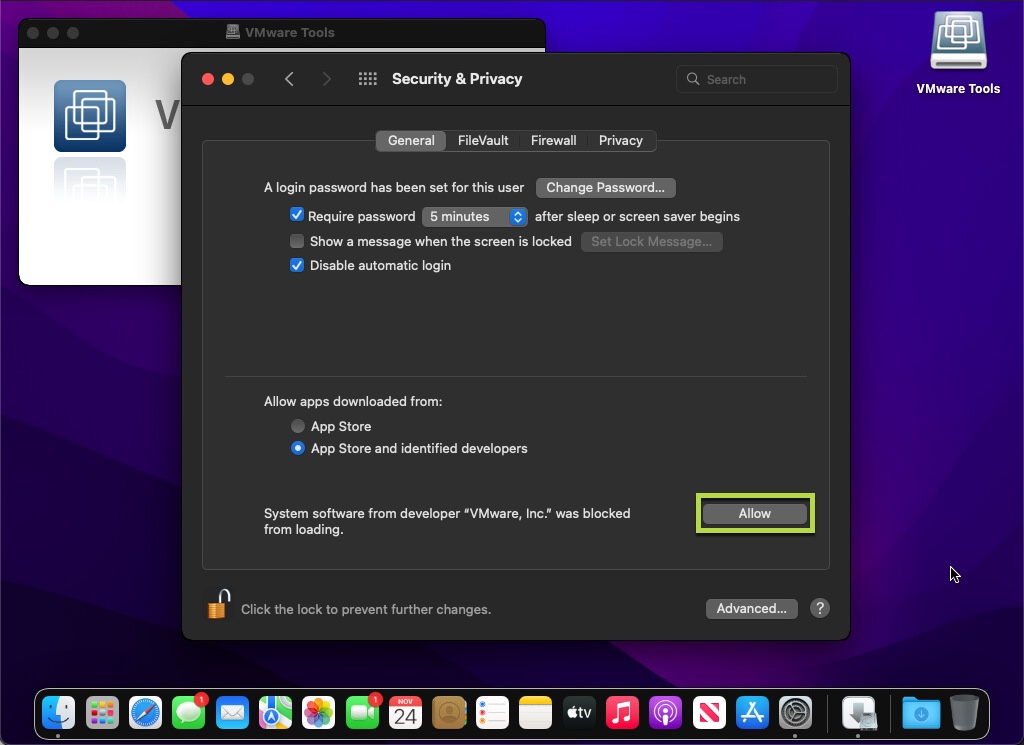
You'll then likely receive a System Extension Blocked prompt during this process. Click on Open Security Preferences. At this point the Security & Privacy window will open up. Once opened, click on the lock in the bottom left and enter in your OS password, then click Unlock.
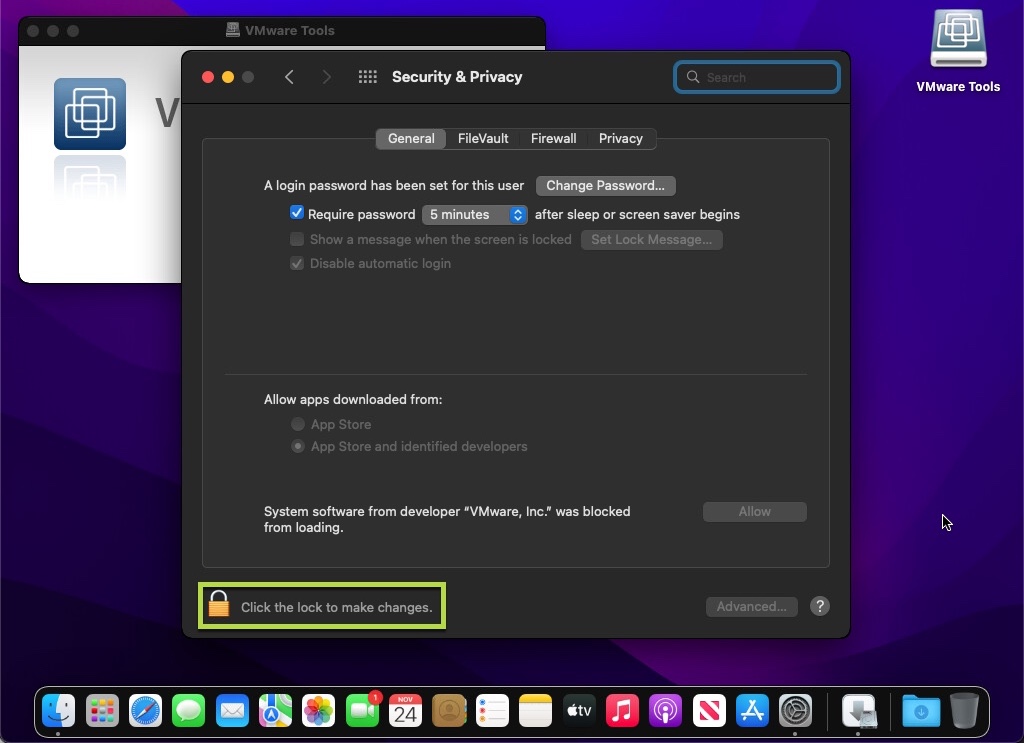
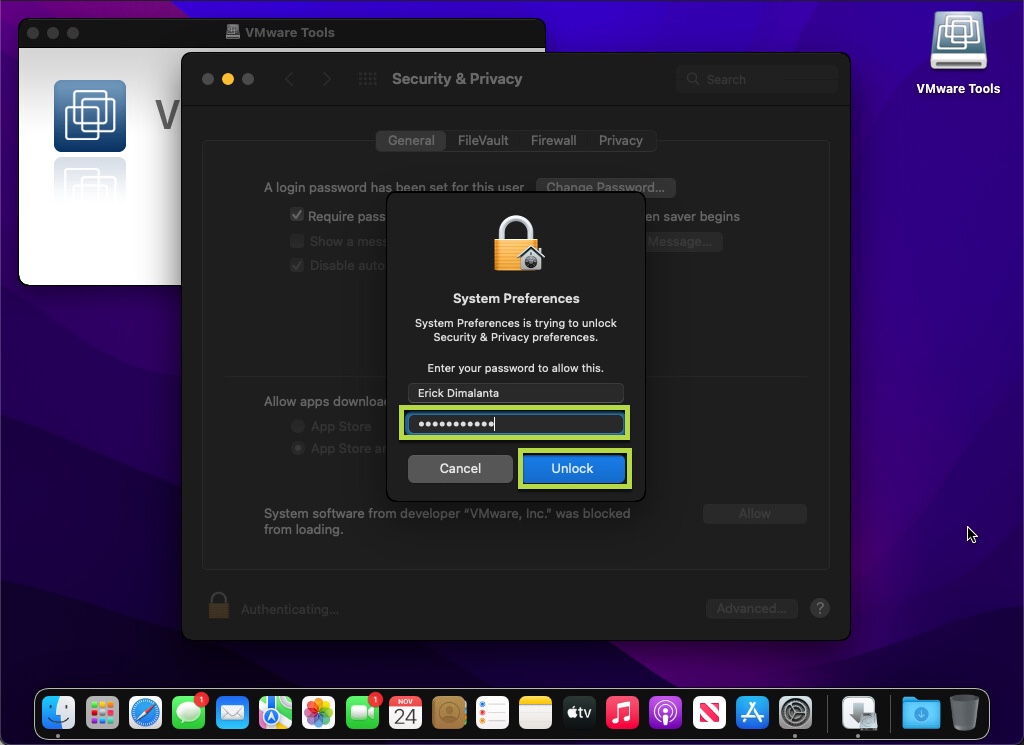
Once done and the lock icon is unlocked, click on the Allow button to allow VMware Tools to continue loading.
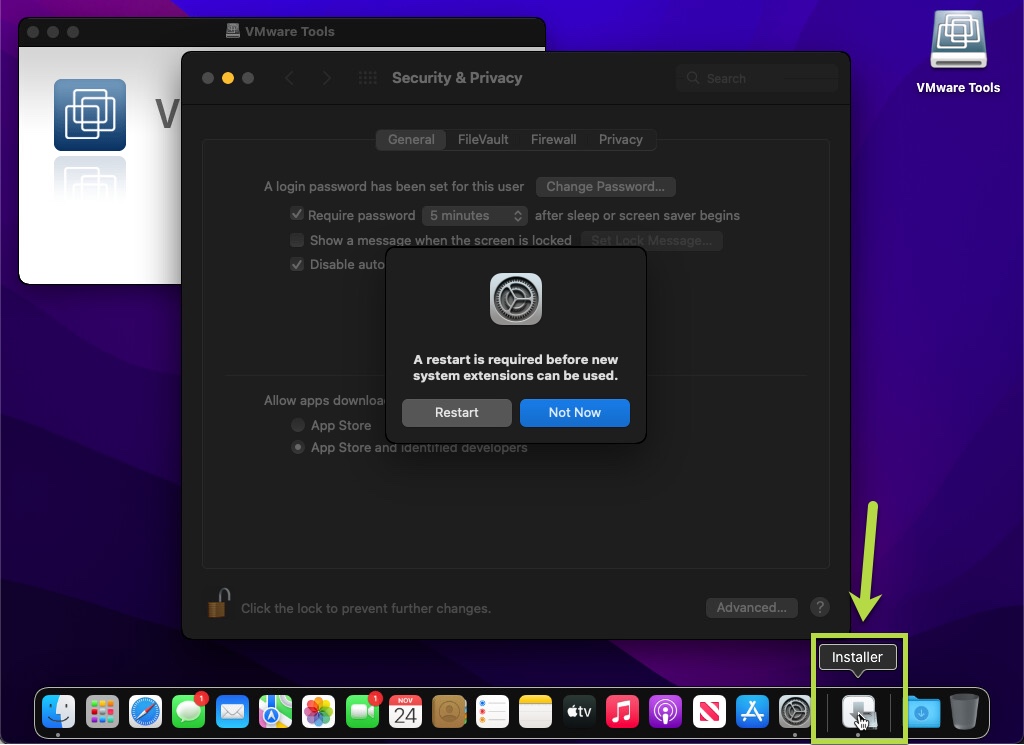
You should now receive a prompt to Restart before using the system extensions. But before doing so, click on the open Installer in the dock below.
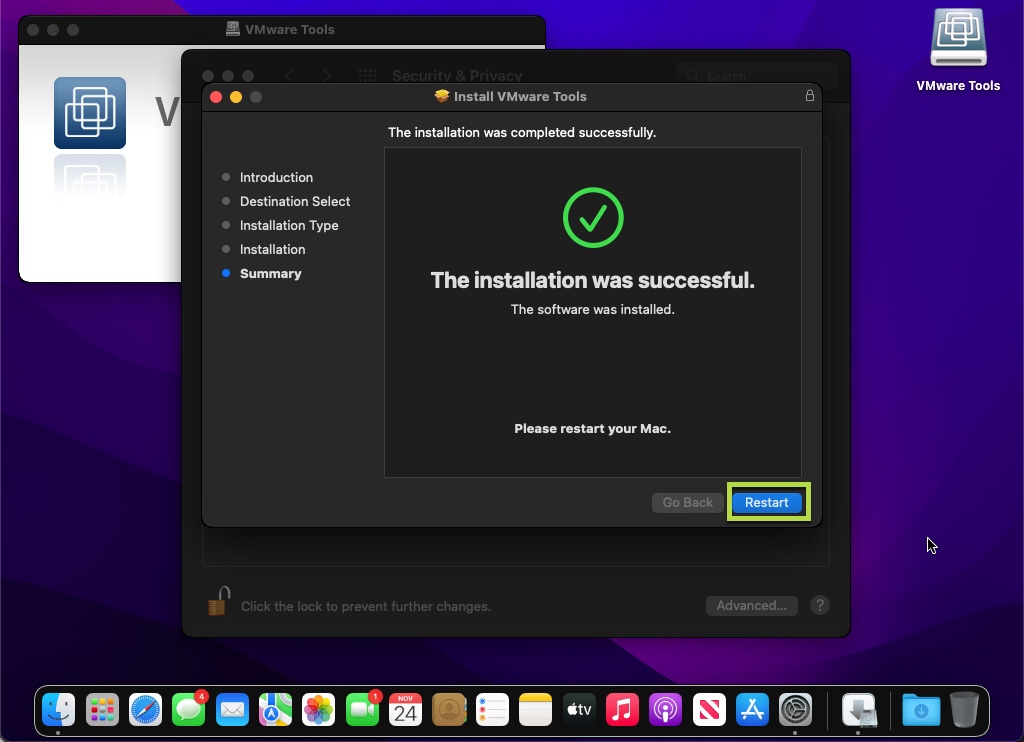
The VMware Tools window should showcase that the installation was successful. Go back to the Security & Privacy window in the background and click on Restart from there.
Once the machine has rebooted, you should now see that VMware Tools are installed for this VM. From there, you can either eject the mounted VMware Tools image from the OS or disconnect it from the CD/DVD Drive 1 option in the VM under Edit settings.

Schweet! All done! You should now have a macOS 12 environment that you can test and break all you want! Have fun! 😎

**Credits to shanyungyang's github and everyone else involved that helped me put this updated simple guide together.**



Hi, folks
Is there any other way you can actually use a ESXi-homed MacOS install other then via host management interface?
You can RDP to a Windows system and work in a full desktop environment feeling like home.
Working in an Web Console or Remote Console of a ESXi host is really a pain (well, it’s sure better than nothing, but still…)
Hey all, just wanted to give back, if you’re stuck in bootloop on Ventura, set the NIC to VMXNET3.
This worked for me and seems to work fine on Monterey too. May require vmware tools before you have network connectivity (I changed Monterey VM after tools install), but def. works for Ventura with this single change.
Lastly, this site has links to apple to download Ventura: https://osxdaily.com/where-download-macos-installers/
Cheers
This, is a great tip. Thank you!
Got it working on ESXi 8.0 U1. Used the settings as described here (so I applied the patch which was originally intended for version 7). During configuring the VM I used the ESXi 7.0 U2 ‘profile’ so to say. I’m running the OS form an NVMe so I also used the virtual NVMe controller.
The only missing piece was changint the e1000 something network driver to vmxnet3.
Thanks Kevin for your suggestion. I’m not sure which specific bootloop issue you ran into that these steps helped to resolve, but for everyone’s awareness the boot issue I’m having (see link below), which happens during upgrade of Monterey to Ventura, unfortunately the steps didn’t resolve my issue. I updated the NIC to VMXNET3 and have the latest VMWare Tools installed and Monterey continues to work fine like this but the upgrade fails.
https://support.apple.com/en-us/HT210901
Thanks! I’ve used unlocker v3.0.2 on ESXi 7.0.3 and I’ve got both MacOS 12 and 13 VMs successfully running. Only hiccup is Safari: in both VMs, Safari would display a blank page on certain (most) web sites when it’s on the foreground but if I bring Finder on the foreground, then the content in Safari will “magically” appear. The web content is actually loaded but not rendered properly. Chrome works fine. Anyone else experiencing this? Try http://www.smh.com.au
Cannot get this working using ESXi 8.0 + Macpro6,1 (late 2013) hardware; gives a new definition to ‘infinite loop’
Did you ever get this working on this hardware?
I manage to get to the install screen and disk utility but I ca not see the EXSI Hard Drive so I can not format it. Any special magic, I’m trying everything possible but so far not going anywhere with this.
No special magic when I installed. It showed up as intended. Try powering off, then remove and re-add the HDD for the VM.
Hello @Erick
I installed Monterey and Ventura on Vmware Esxi 7.0 U2 successfully.
But I haven’t managed to get networking. I set the IP addresses as static IP as the other Linux VMs. But I cannot even ping the gateway or Google DNS IP.
Is there a trick or specific configuration that would allow me to have an ethernet network on Mac OS (Monterey or Ventura)?
Thank you
Hi Petti. I haven’t come across any specific network issues before. Can you ping other Linux VMs if you put it on the same vlan? Maybe remove the network adapter then re-add or install VMware tools?
Hi there! Is it posible to get that running on esxi with secure boot? After install stuck on purble screen.
Only help was to disable secure boot.
All vib signatures verified. Unrecognized tardisks: [unlocker.tgz]
vmkramdisk is deprecated: custom.vgz mount
Is it posible to sign those files?
Hey Erick
First, thank you for all your work compiling this information.
Second, if I have ESXi v8, are these instructions still just as good? I assume yes as long as I make the VM using the ESXi v7 profile, and follow your suggestions for the VM. I will know soon enough as I am currently rebooting the server after the patch.
Third, for anyone who is interested, Dr. Donk has a new Unlocker version, v4.0.6. The steps listed in your process change a bit with this new version, but if anyone is interested, you can get that here:
https://github.com/DrDonk/esxi-unlocker/releases
Thanks again for helping us through this
I tried v4.0.6 but then I couldn’t start any VM. Not good. So I removed and used v3.0.2 and it’s working perfectly well, all VMs start, including Monterey.
Hi @Erick,
I’ve followed your helpful guides in the past for installing Mac OS on ESXi. When Apple releases a new OS version, I typically do an upgrade instead of a fresh install as I have OS-level configurations and app installs in place that I want to keep in tact. Usually this works fine as long as I’m using the latest version of the Unlocker tool. However, after upgrading from Monterey to Ventura I’m getting the following “circle with a line through it” error on bootup. Any ideas what might be going on here? Do you have a guide for Ventura?
https://support.apple.com/en-us/HT210901
Thank you!!
Hi Brad. I haven’t actually tried to update recently since I’ve been occupied with other things lately. Did you have a snapshot or a clone of the Monterey VM to revert back?
I won’t be able to get to it for a bit but once I do I’ll chime back and let you know what I find.
Apologies for the delay in responding Erick. I was thinking I would get an email notification with you replied but I didn’t and just now saw that you posted. Yes thankfully I did make a copy of the Monterey VM right before I upgraded and I will revert back to it for now. I look forward to your article on Ventura when you get the time and thank you again for all of your help and support.
Same here Brad. I did a clean install of Monterey a couple of days ago with no issue. Then I did an in place upgrade to Ventura and experienced cycle booting. Luckily I read your post and made a snapshot before the upgrade so I was able to revert back … strange …
esxi moaned about the VMware tools v11 being out of date
I installed 12.1.0 which is the newest Mac VMware tools I could find.
https://customerconnect.vmware.com/downloads/details?downloadGroup=VMTOOLS1210&productId=614
Thanks for the instructions,
Using an AMD chip here with esxi 7.0u3
I had to amend the vm’s vmx file located where i told esxi to install the VM
/vmfs/volumes/my-storage/
vi monterey.vmx
add the following to the end
smc.version = “0”
cpuid.0.eax = “0000:0000:0000:0000:0000:0000:0000:1011”
cpuid.0.ebx = “0111:0101:0110:1110:0110:0101:0100:0111”
cpuid.0.ecx = “0110:1100:0110:0101:0111:0100:0110:1110”
cpuid.0.edx = “0100:1001:0110:0101:0110:1110:0110:1001”
cpuid.1.eax = “0000:0000:0000:0001:0000:0110:0111:0001”
cpuid.1.ebx = “0000:0010:0000:0001:0000:1000:0000:0000”
cpuid.1.ecx = “1000:0010:1001:1000:0010:0010:0000:0011”
cpuid.1.edx = “0000:0111:1000:1011:1111:1011:1111:1111”
smbios.reflectHost = “TRUE”
hw.model = “MacBookPro14,3”
board-id = “Mac-551B86E5744E2388”
save the file and start the vm
https://i.imgur.com/ucn0aCW.png
Thanks; I really appreciate the assistance on this.
Very nice! You are up and running! Thanks for stopping by and commenting. 🙂
Hi from Spain! It has been beautiful like …step by step for dummies 🙂 Great job and thanks in advance, working like a charm en my AMD Ryzen 5 5600G with Radeon Graphics, just add to * .vmx file : smc.version = “0”
cpuid.0.eax = “0000:0000:0000:0000:0000:0000:0000:1011”
cpuid.0.ebx = “0111:0101:0110:1110:0110:0101:0100:0111”
cpuid.0.ecx = “0110:1100:0110:0101:0111:0100:0110:1110”
cpuid.0.edx = “0100:1001:0110:0101:0110:1110:0110:1001”
cpuid.1.eax = “0000:0000:0000:0001:0000:0110:0111:0001”
cpuid.1.ebx = “0000:0010:0000:0001:0000:1000:0000:0000”
cpuid.1.ecx = “1000:0010:1001:1000:0010:0010:0000:0011”
cpuid.1.edx = “0000:0111:1000:1011:1111:1011:1111:1111”
smbios.reflectHost = “TRUE”
Awesome! Glad to hear it and you found it useful. Thanks for stopping by.
[…] Installing macOS 12 Monterey on VMware ESXi 7 Update 3 […]
[…] Installing macOS 12 Monterey on VMware ESXi 7 Update 3 […]
i’m runing esxi 7.0.3 witha x86 machine, follow your step to install teh unlocker, the “smcPresent = true”,but still keep looping on start apple logo and error messgae “your computer restarted becasue of a problem”, anything i do to make it continue to install?
I have a copy of Monterey as a .pkg file. I do not have a mac looking to run in VMWare 7.0u3.
Do you have a process to convert the pkg file version 12.6 to and ISO file?
Thank you
Thanks a lot buddy! Perfect Job!
Easy to follow, everything working!
How do I get OS image? The link does not open download and I do not see any ‘Get’ button it just tells me to go to the Store.
Hi Leo. Are you on macOS or Windows? If you want to create the ISO yourself, you’ll need to be on a macOS machine. I just tried the link on my end and it works fine under macOS.
Go to this link
https://mrmacintosh.com/macos-12-monterey-full-installer-database-download-directly-from-apple/
For AMD CPU you can visit this article:
https://www.techyinc.tech/operating-system/windows/how-to-install-macos-monterey-on-windows-pc-using-vmware/
Thank you. With your guide, I installed macOS 12.5.1 on Esxi 7.0.3(build-20036589) on my NUC11TNHv70L.
Hi Erick
Great guide! Thanks for your efforts to sharing your knowledge.
Does it matter if my ESXI host is on an AMD system rather than an Intel?
I tried your guide and have confirmed that the unlocker patch was installed correctly. However, my VM is just stuck on the Apple logo screen. I haven’t been able to proceed into the installation stage yet.
I’m using ESXI v7.0U3 and the MacOS is Monterey 12.5.1
Appreciate your help in advance
Hi BenS. Take a look at this comment below. It may help with your AMD system.
https://vmscrub.com/installing-macos-12-monterey-on-vmware-esxi-7-update-3/#comments/152
Just wanted to say what a great guide this was, setup Monterey no problems on ESXi 7.0U3. Only thing to touch up on the guide was in Step 5, to put the reboot disclaimer before the reboot command as when you’re following step by step this kills of any other stuff you may have running: “I know it goes without saying, but please make sure you have no running VMs before typing reboot. ” 🙂 Brilliant – thanks.
Thanks for the suggestion John. I’ve edited that step and didn’t mean to troll anyone after the fact. 😀
All the instructions worked like a charm until I booted the Mac VM using a Monterrey installation image created today. The boot process started ok but after a minute or so the screen displayed a circle with a line through it. Apple describes this as “A prohibitory symbol, which looks like a circle with a line or slash through it, means that your startup disk contains a Mac operating system, but it’s not a version or build of macOS that your Mac can use.
I’ll try installing an early version of the OS.
In any case, thanks for the very clear and thorough documentation.
Hello,
the unlocker code is apparently for 10/18/20 3.0.1 – Fix for ESXi 7.0 U1 (7.0.1)
it wasn’t maintained for 2years?
https://github.com/erickdimalanta/esxi-unlocker
is it safe to run on esxi 7.0u3 on production machine?
thanks
Hi John – I have listed a Disclaimer at the top of this guide stating that this should only be run in a lab environment and not in production. So the short answer is “No” it isn’t safe to run this in prod.
What is with hw.model?
My macOS seems to be slow.
Thank you so much for this guide! It worked great and I was able to get MacOS running great on ESXi.
There are many guides out there but this one is by far the best I have found. Is there anyway to get the resolution higher i only have the choice of one? Also do you have a guide to get it working with iMessage?
Hi Kevin. I’m able to scale the resolution by resizing the active VMRC window. I don’t typically run the VM using a browser tab if that’s how you are doing it. iMessage is synced with iCloud. This should work once you add your Apple ID. Hope this helps.
Here is the unlocker.tgz if you download the unlocker.
↓
“You’ll first need to download the unlocker zip file here.”
But when I download it here in Git, there is no unlocker.tgz. Why is this?
↓
“The above link should be a direct download to the unlocker from github. the file name is esxi-unlocker-master.zip.”
Just got this working with latest Monterey 12.4 on ESXI 7.0.3d… I’m really blown away.. I may never power up my MacBook again… lol
上記の手順で実施できましたか?
私は上手くできておりません。
Can you share how? Can’t get it to work in 7.0.3d, just shows SMCpresent = false
Was it – in fact – working on 7.0U3d? I’ve been hearing that it still does not work. I’m wondering if maybe it is an architecture thing. What environment are you using that allows you to get macOS 12.4 to work on 7.0U3d? BTW, I *have* got it working on 7.0U3c, but used macOS 12.1, then upgraded to 12.4 – and that worked. Did you do this *directly* using 7.0U3c, then upgraded to 7.0U3d, or did you use 7.0U3d *directly*? Any ideas?
Trying to deploy right now but I can’t find a workaround to set the right permission to the unlocker files.
It seems that you can’t change permission by design … so?
Running esxi 7.0 U3c on an Intel NUC10i7FNH
Any suggestion?
Hello Michele. I didn’t have any issues with permission. What error did you receive? Instructions to set the folder permissions here.
[root@localhost:/vmfs/volumes/5eb3d5d3-424db32a-8b19-1c697a0b0615/Archivio ISO] unzip esxi-unlocker-master.zip
Archive: esxi-unlocker-master.zip
creating: esxi-unlocker-301/
inflating: esxi-unlocker-301/esxi-install.sh
inflating: esxi-unlocker-301/esxi-smctest.sh
inflating: esxi-unlocker-301/esxi-uninstall.sh
inflating: esxi-unlocker-301/readme.txt
inflating: esxi-unlocker-301/unlocker.py
inflating: esxi-unlocker-301/unlocker.tgz
[root@localhost:/vmfs/volumes/5eb3d5d3-424db32a-8b19-1c697a0b0615/Archivio ISO] chmod 775 -R esxi-unlocker-301/
[root@localhost:/vmfs/volumes/5eb3d5d3-424db32a-8b19-1c697a0b0615/Archivio ISO] cd esxi-unlocker-301/
[root@localhost:/vmfs/volumes/5eb3d5d3-424db32a-8b19-1c697a0b0615/Archivio ISO/esxi-unlocker-301] ./esxi-smctest.sh
-sh: ./esxi-smctest.sh: Operation not permitted
[root@localhost:/vmfs/volumes/5eb3d5d3-424db32a-8b19-1c697a0b0615/Archivio ISO/esxi-unlocker-301]
Hmm…that’s a bit different than a “Permission Denied” I’ll have to try and do some digging on that.
Can you try disabling “Secure Boot” in the BIOS on your NUC and try again?
I’ll try after dinner … need to grab a cable and connect directly to it to make that change … I’ll update you.
In the meantime thanks!
Secure Boot disabled
Bang!
Sweet … it works like a charm … up and installing
Thanks Erick … I didn’t think about it
Sweet. Glad to hear it! Rock on! 🙂
Erick,
Its were great experience to follow your manual.
All works.
Thank you!!!
Erik,
I have used both the Big Sur and this Monterey VM setup guides and they both worked perfectly.
I am having a similar issue with using the yellow minimize button on windows causing a delay in closing. Brad and Ralph both mentioned this as well. Wondering if there are any updates on this?
I also had an issue with chrome. I had to turn off the hardware acceleration for it to render correctly.
I was wondering if you have looked at doing this same type of install on a mac Running VMware Fusion? Is it possible to do that?
Erick – sorry I misspelled your name.
Hi Phil. No worries about the name :). I haven’t tested too much beyond the initial install into a VM. I’m not running Fusion on mac so I don’t have a way to test that scenario.
This will fix your problem,
https://www.youtube.com/watch?v=i98xktU4_MI
It’s under dock and menu bar
Unfortunately the unlock process not works.
-sh: ./esxi-install.sh: Operation not permitted
Haven’t found any workaround. on VMWare kb: https://kb.vmware.com/s/article/78689
You can source the script:
“`source ./esxi-install.sh“`
Ran through your process and got FANTASTIC results…!!!
I have a 4-core 3.4 GHz proc’d server loaded with macOS 12.3.1 (Monterey) at the time of this posting, running VMWare ESXi v7.0U3. It works be-a-u-tifully…!!!
I wrote a script that greatly simplifies the process of generating disk images from macOS installer apps. It generates zlib-compressed DMG images by default, because ESXi on Mac actually has support for that format; I’d imagine it’ll work on other hardware as well. Find it here: https://ericfromcanada.github.io/output/2022/macos-installer-disk-images-for-virtualization.html
How do you format and where do you insert info such as serial number, product name, bord product, MLB and ROM in the vmx file in order to have working iservices, Apple ID etc?
Hi Eric,
thanks a lot for this great guide.
Took me ~2 hours to get MacOS running on ESXi 7U2 (and a lot of that was just install / waiting time). Excellent description of steps and really easy to follow.
2 suggestions:
– My system runs on an Ryzen 5 3600 and got stuck in the boot loop until I found the solution in the comments. In your old article the AMD notice was included in the article itself at the top, could you do this here as well?
– Your config screenshot shows 4 CPU / 4 GB RAM, which I used at first. Found the system to be sluggish and I increased to 8 CPU / 8 GB RAM. Not sure if 4/4 was ok for older OS versions, but here it seems a bit low.
Thanks again for the great work, I will now try to get some applications running on my new Virtual MacBook.
You deserve a prize. This tutorial or instruction is very detailed. However I setup ESXi on a power mac and I didn’t have to use unlocker. Can you explain why that is the case? Was it that my version of 7.x is later?
Because you are using Apple hardware (assuming you meant that you installed ESXi *on* your power mac). The unlocker lets you bypass Apple’s hardware license agreement, which basically only allows MacOS to run on Apple hardware.
Great tutorial! I have downloaded Monterey 12.3. How did you calculate the DMG size as 13800.1m?
For 12.3 I’m getting 12265.4 and am surprised it is smaller.
Excellent, install of Monterey 12.2.1 worked flawlessly. Now if only I could have sound working.
This may not be the best place to post this question but it’s tough to get community support for this type of installation. Does anyone else have the issue where minimizing any window using the yellow “-” button and then restoring the window by clicking on the app in the dock; either operation causes a temporary freeze (e.g. several second delay)? CPU/GPU/Memory utilization is very low when this happens so I’m having a tough time figuring out what’s causing the issue. Hiding any window using the red “X” button and restoring the hidden window is snappy. This one has me puzzled. I would really appreciate it if anyone has any ideas on how to solve this issue. Thanks!
I have the exact same issue. It appears consistently whenever I minimize a window to the Dock. Closing and opening is fast.
This is apparently caused by the “windowserver” process, which is the MacOS process actually handling all the screen / window actions. When minimizing to the Dock the CPU usages spikes for this process, causing delay. When symply closing the window the process is unchanged.
Switching off the animation for the docking process changed nothing.
I suspect this is related to the usage of the VMWare graphics card. There are other issues related to graphics on the system as well (e.g. videos don’t play in Safari but work fine in Firefox).
I am trying to passthrough a Radeon to this machine, but have not got that working yet.
This will fix your problem,
https://www.youtube.com/watch?v=i98xktU4_MI
It’s under dock and menu bar
This will fix your problem,
https://www.youtube.com/watch?v=i98xktU4_MI
It’s under dock and menu bar
Hey Erick, thanks as always for the wonderful article. Noticed a minor case issue that tripped me up for a few minutes in case you want to fix it for others. The “v” in volumes in the command below should be uppercase “V”.
hdiutil eject -force /volumes/Install macOS Monterey
Corrected:
hdiutil eject -force /Volumes/Install macOS Monterey
Hi Brad. Thanks for sharing. That’s strange you had that issue. I just went through the process I listed out in this blog and copied and pasted all the commands without any errors. The hdiutil eject command with a lower case “v” in volumes worked fine for me.
Strange! Must be something on my machine then but glad to hear it works for you. Sorry for the false alarm!
No worries. I thought the same, it could have been my setup as well. Thanks for sharing in case someone else runs into this error. 🙂
APFS/HFS can be formatted in case-sensitive mode, so that is likely the issue encountered here.
Erick,
Great post and much appreciated the detail put into it. I just installed the latest ESXi version 7.0.3 Build 19193900 which is the exact same as the one described in this article.
I followed everything to the “T”. I apparently still get the infinite loop with the Apple logo when I try to install (either Monterey or Big Sur). One difference I notice is that there is no progress bar underneath the Apple logo in mine.
I noticed another difference is that I’m AMD and you’re Intel. But I don’t see that as being an issue since it’s all ESXi, same version numbers, etc.
I’ve been scouring around the net since yesterday almost non-stop to try and find a fix for this and haven’t been successful.
Any ideas?
Thanks!
-gregg
Hi Gregg. Thanks for stopping by. Someone on my previous Big Sur post added how they were able to get it working with an AMD based system.
https://vmscrub.com/installing-macos-11-big-sur-on-esxi-7-update-1/#comments/42
Maybe this can help point you in the right direction.
Perfect! This helped tremendously! At least it got me going. I’ll reply over on that thread. Thanks!
Guys, do u have issue with update from 12.1 to 12.2.1?
My macOS don’t see any updates 🙁
vmWare EXSi 7
Does this get messaging/imessage to work? Thanks!
Hi Charles. Yes imessage does work. You can add your icloud account to your deployment and sync imessage. Works fine on this end.
Thank you so much. I really appreciate your site and all your posts!
Thank you Charles. You’re very welcome and I’m glad you found it useful. 🙂
Hi, thanx for the guide but…..GPU passthrough is impossible on ESXi with Mac OSX VM’s…..
GPU Passthru ‘was’ impossible
Fantastic tutorial and runs out of the box ! Thanks for sharing !
You’re welcome. Glad to hear it was helpful for you. 🙂
You should use the latest 3.0.3 unlocker version for 7.0U3
https://github.com/netgc/esxi-unlocker-3.0/releases